128 Mail and Messaging
6. Enter text and insert audio clips by tapping the respective areas.
See “To add text to an MMS message” and “To add an audio clip
to an MMS message” for details.
7. To add more slides, tap or tap Menu > Slides > Insert Slide.
Repeat steps 5 and 6 to insert a photo/video, text, and audio into
each slide that you added.
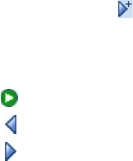
While on a slide, you can:
• Tap to preview the slide.
• Tap to go to the previous slide.
• Tap to go to the next slide.
8. While composing an MMS message, you can also do the
following:
• Tap Menu > Options > Background to choose a background
color from the list.
• Tap Menu > Options > Text Layout, then choose whether to
place the text above, below, to the left or right of the photo/
video.
• Tap Menu > Options > Send Options to specify the sending
time, validity, priority, class, and other settings for a message.
• Tap Menu > Attachment to include a contacts card, calendar
appointment, or any file as an attachment.
9. Tap Send to send the MMS message.
Notes
You can also send an MMS message directly from the Pictures & Videos
or Camera program. Do one of the following:
• In Pictures & Videos, select a picture from My Pictures, and tap
Menu > Send. In Select an account, tap MMS.
•
Capture a photo or an MMS video clip using the camera (optional), and
tap the Send icon. In the Send File dialog box, tap Send via MMS
.
To create an MMS message from a template
• While on an MMS message, tap Menu > Template > New from
Template to compose a message using a predefined template.


