


Deployment Guide for the Polycom VVX 1500 D Phone
B - 2
7. Select Page >Shared folders to specify the server-side directory where
the provisioning files will be located (and the log files uploaded).
8. Select Add and pick the directory.
9. To allow the phone to upload logs onto the provisioning server, select the
Shared Folders->Files->Select Write and Delete checkboxes, and then
select OK.
10. Copy the configuration files from the software download into the
directory specified above.
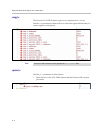
11. Determine the IP address of the provisioning server by entering ipconfig
at a command prompt to display the server network configuration.
The IP Address of the provisioning server is shown.
12. Do the following to configure the phone to point to the IP address of the
server:
a Press the phone’s Menu key.
b Through the menu, select Settings >Advanced >Admin Settings
>Network Configuration.
When prompted for the administrative password, enter 456.
c Scroll down to Server Menu, then press the Edit soft key.
d Using the right arrow key, select FTP as the Server Type.
e Enter the IP address from step 11 as the Server Address, and then
press the OK soft key.
f Enter the username and password from steps 5 and 6 as the Server
User and Server Password.
g Scroll down Save & Reboot, then press the Select soft key.
The phone will reboot.
The phone will upload two logs files to the directory specified in
step 9: <MACaddress>-app.log and <MACaddress>boot.log .