


11 - 10
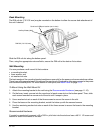
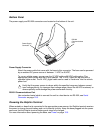
Desk Mounting
The DIN rail slot (7.5 X 35 mm) may be mounted on the bottom to allow for secure desk attachment of
the unit if desired.
Slide the DIN rail slot along the bottom panel.
Then, using the appropriate nuts and bolts, secure the DIN rail to the desk or flat surface.
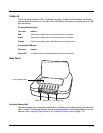
Wall Mounting
You can purchase a wall mount kit that contains
• a mounting bracket,
• t h r e e s c r e w s , a n d
• six washer/nut sets.
The back wedge of the mounting bracket contains an open slot for the power and communications cables.
There is an extra space between this slot and the rear panel of the base to allow easy access to the power
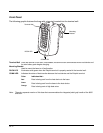
and communications ports. For more details on both ports, see Back Panel on page 11-3.
To Mount Using the Wall Mount Kit
1. Attach the mounting bracket to the wall using the Recommended Hardware (see page 11-10).
2. On the base, insert a screw into the round end of each screw slot on the bottom panel. Then, slide
each screw towards the narrow end of the slot until it snaps in place.
3. Use a washer/nut set on each of the three screws to secure the screw in the slot.
4. Place the base on the mounting bracket; match the holes up with the secured screws.
5. Use the remaining washer/nut sets on each of the three screws to secure the base to the mounting
bracket.
Recommended Hardware
If a metal or wood stud is present, drill a 3/32 in. pilot hole into the stud and use a #6 X 1 1/2 screw and
washer to attach the bracket to the wall.
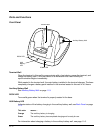
Auxiliary Battery Well
Serial and USB port location (not in view)
DIN Rail (7.5 X 35 mm)