


Cisco 7920 Error Message − Association Failed, No AP Found•
Cisco 7920 Error Message − No Service IP Config Failed•
Cisco 7920 Error Message − Registration Rejected•
Cisco 7920 Error Message − Connecting to Cisco CallManager 0−5 (cannot connect, registration
fails)
•
Cisco 7920 Configuration Utility Can Not Connect to Cisco 7920 − Connection Busy•
LEAP Authentication Fails•
Cisco 7920 Exhibits Problems After Configuration Changes
The Cisco 7920 will occasionally exhibit problems after you have changed its configuration with the Cisco
7920 Configuration Utility. These problems includebut are not limited tothe appearance of the No AP
Found message and the No Service − IP Config Failed message.
These problems can occur while the Cisco 7920 is still connected to the PC that is running the Cisco 7920
Configuration Utility. They can also occur after you have logged out of the Cisco 7920 Configuration Utility,
stopped the Cisco 7920 USB port on the PC, and disabled the USB port on the Cisco 7920.
If this situation occurs and you are logged into the Cisco 7920 with the Cisco 7920 Configuration Utility:
Log out of the phone.1.
Stop the 7920 USB port on the PC.2.
Disable the USB port on the Cisco 7920.3.
If the problem persists, then power cycle the Cisco 7920.
If the problem persists after you power cycle the Cisco 7920, refer to the additional troubleshooting tasks in
this section.
Cisco 7920 Error Message − Association Failed, No AP Found
If the Cisco 7920 displays the No AP Found message and you know that your Cisco Aironet 1200 AP is
operational, then the most common error is that the SSID on the Cisco 7920 is not correct.
Note: If you are using VLANs, the SSIDs on the Cisco Aironet 1200 AP are VLAN−specific. Therefore, you
must compare the SSID for the correct VLAN on the 1200 AP to the SSID on the Cisco 7920. Set the first
SSID entry on the Cisco 7920 to the VLAN SSID that you configured on the 1200 AP for the VLAN that you
want to use.
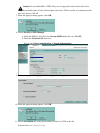
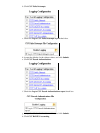
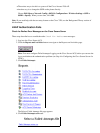
On the Cisco 7920, choose Menu > Network Config > 802.11b Configuration > Wireless Settings
> SSID > SSID1 > Specify.
1.
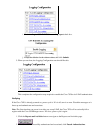
Compare the SSID on the Cisco 7920 with the SSID that you entered in the Cisco Aironet 1200 AP. If
they are different, change the SSID on the Cisco 7920 or on the 1200 AP. If you need to verify the
SSID that you are using on the 1200 AP, select one of these option:
Verify the SSID on the Cisco Aironet 1200 AP without VLANs (see Step 2 of Configuring
the Cisco Aironet 1200 AP).
♦
Verify the SSID on the Cisco Aironet 1200 AP with VLANs (see Step 1 of Step−by−Step
Instructions for Configuring VLAN2).
♦
2.
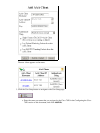
If you want to change the SSID on the Cisco 7920, do so directly on the Cisco 7920 itself or from the Cisco
7920 Configuration Utility. To change the SSID on the phone directly, use the next procedure.