


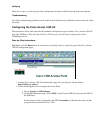
You can substitute any Aironet Wireless device that supports 802.11b clients. The Cisco Aironet 1200 AP
examples provide some guidelines for how you should configure your Aironet device.
Conventions
For more information on document conventions, refer to the Cisco Technical Tips Conventions.
Background Theory
The Cisco 7920 is supported by Cisco CallManager 3.2 and later. It is configured as a Cisco 7960 IP Phone in
Cisco CallManager; however, it has its own image file. Wireless devices, such as the Cisco Aironet 1200 AP,
treat the Cisco 7920 like a typical wireless client.
If you are not already familiar with Wireless Security issues and best practices, refer to Wireless LAN
Security White Paper before you proceed with a live installation of a Cisco 7920.
You should be familiar with the basic administrative and user tasks for the Cisco 7920. The Cisco 7920
documentation is available in the Products and Services area of Cisco.com.
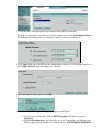
If you have not already configured the Cisco 7920 or any other Cisco IP Phone on your Cisco CallManager
server, see the Appendix: Configuring the Cisco 7920 with CallManager section of this document before you
begin. Add the additional IP phone at this time as well: it is required to perform VoIP test calls to and from
the Cisco 7920.
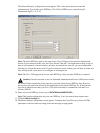
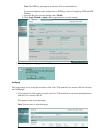
Tip: When you use the USB cable that is provided with the Cisco 7920 to configure it with the Cisco 7920
PC−based Configuration Utility, the Cisco 7920 appears as a network device on the PC. Any time that the
Cisco 7920 is connected to the PC through the USB cable, you can see that this connection exists. On the PC,
choose Start > Settings > Networking and Dial Up Connections. One of the connections is the Cisco 7920.
Do not make any changes to it. It is only used by the Cisco 7920 Configuration Utility through the USB port.
When you disconnect the Cisco 7920 from the PC, this interface disappears from your Networking and Dial
Up Connections until the next time that you connect it. Issue the ipconfig /all command (from a command
prompt on your PC) to view the IP settings used by the Cisco 7920 USB connection.
If you are not already familiar with the text editing mode for the Cisco 7920, consider these points:
The asterisk (*) toggles between lower and upper case characters.•
The hash (#) allows you to enter Special Characters. Press the Back key to exit Special Character
mode.
•
Press the Clear key to delete the previous character.•
The large buttons with white arrows move the cursor left and right.•
To enter a character, press the number button with the character that you want to use. Keep pressing
the button until the character shows up.
For example, to enter the letter z press the 9 key four times. To enter the letter Z, press the
asterisk first then press the 9 key four times.
Once the character that you want is displayed, wait for a few seconds. The cursor will move to the
right of the last character that you entered. To enter a number keep pressing the button until the
number appears.
•