


3. INSTALLATION
BAS-300G, BAS-311G, BAS-326G
11
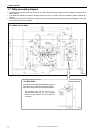
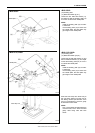
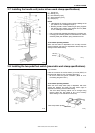
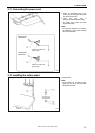
3-7. Installing the treadle unit (motor-driven work clamp specifications)
(1) Treadle unit
(2) Bolts [3 pcs.]
(3) Plain washers [3 pcs.]
(4) Spring washers [3 pcs.]
(5) Nuts [3 pcs.]
NOTE:
• Install the bolt for mounting hole A before installing the oil
pan. (Refer to “3-3. Installing the oil pan.”)
• Mounting hole B is used to install the gas spring supports
with the bolt, plain washer, spring washer and nut. (Refer
to "3-4. Installing the machine head".)
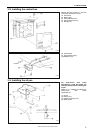
* Use a commercially-available foot switch and connecting rod.
* If changing the mounting position for the treadle unit, use the
accessory bolts, plain washers, spring washers and nuts.
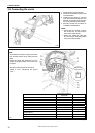
<Foot switch operating method>
When the foot switch is depressed to the 1st step, the work
clamp is lowered, and when it is depressed to the 2nd step, the
sewing machine starts sewing.
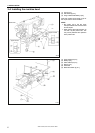
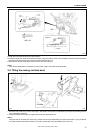
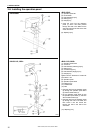
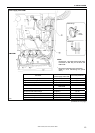
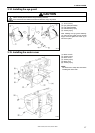
3-8. Installing the two-pedal foot switch (pneumatic work clamp specifications)
(1) Foot switch
Insert the connector for the foot switch (1) into P6 (FOOT) on
the main PCB. (Refer to "3-9. Connecting the cords".)
* Be sure to make the ground connection. (Refer to “3-10.
Connecting the ground wire”.)
<Foot switch operating method>
When the work clamp switch (left) is depressed, both work
clamps are lowered, and when the start switch (right) is
depressed, the sewing machine starts sewing.
* The work clamp lowering method can be changed using
memory switch No. 002. (Refer to “6-3. List of memory
switch settings” in the instruction manual CD.)
4921Q
1st step
2nd step
4441Q
4923Q
Start switch
Work clamp switch (2-step)
2972B