


DHCP Server Administration
Issue 2 December 2007 63
Windows 2000 DHCP Server
Verifying the Installation of the DHCP Server
Use the following procedure to verify whether the DHCP server is installed.
1. Select Start-->Program-->Administrative Tools-->Computer Management.
2. Under Services and Applications in the Computer Management tree, find DHCP.
3. If DHCP is not installed, install the DHCP server. Otherwise, proceed directly to Creating
and Configuring a DHCP Scope for instructions on server configuration.
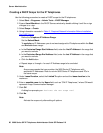
Creating and Configuring a DHCP Scope
Use the following procedure to create and configure a DHCP scope.
1. Select Start-->Programs-->Administrative Tools-->DHCP.
2. In the console tree, click the DHCP server to which you want to add the DHCP scope for the
IP telephones. This is usually the name of your DHCP server machine.
3. Select Action-->New Scope from the menu.
Windows displays the New Scope Wizard to guide you through rest of the setup.
4. Click the Next button.
The Scope Name dialog box displays.
5. In the Name field, enter a name for the scope such as “CM IP Telephones” (where CM
would represent Avaya Communication Manager), then enter a brief comment in the
Description field.
6. When you finish Steps 1 - 5, click the Next button.
The IP Address Range dialog box displays.
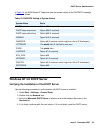
7. Define the range of IP Addresses used by the IP telephones listed in Table 3:
Required
Network Information Before Installation - Per DHCP Server. The Start IP Address is the
first IP Address available to the IP telephones. The End IP Address is the last IP Address
available to the IP telephones.
Note:
Note: Avaya recommends not mixing 9600 Series IP Telephones and PCs in the same
scope.
8. Define the subnet mask in one of two ways:
● The number of bits of an IP Address to use for the network/subnet IDs.
● The subnet mask IP Address.
Enter only one of these values. When you finish, click the Next button.
The Add Exclusions dialog box displays.