


20
Setting the Menu List
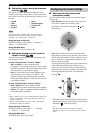
■ Adjusting the ring tone volume
You can adjust the ring tone volume by pressing VOL +/–.
Using the keys on this unit
In the initial display, select “Menu” → “Settings” →
“General Settings” → “Ring Volume”.
y
During the ringing volume setting, the ringing tone is generated
for use as the test tone. Pressing switches it to the ringing
tone for IP network calls, pressing switches it to that for
telephone calls, and pressing switches it to that for the
extension call using telephone circuit. The set volume is applied
commonly to the IP network and telephone ringing.
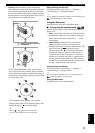
■ Controlling the system using the remote
operation function
This function is reserved for future extension.
Using the keys on this unit
In the initial display, select “Menu” → “Settings” →
“General Settings” → “Remote Control”.
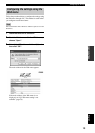
■ Configuring the backlight off setting
Select the time until this unit turns off the backlight
automatically when it is not engaged in a call.
• Disable (Default): Select this setting to keep the
backlight on
• 3 minutes
• 5 minutes
• 10 minutes
• 30 minutes
Using the keys on this unit
In the initial display, select “Menu” → “Settings” →
“General Settings” → “BacklightOffTime”.
Using the Web menu
In the Web menu, select “Backlight OFF Time”.
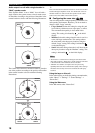
■ Adjusting the LCD contrast
You can adjust the contrast of the display by pressing
VOL +/–
.
Using the keys on this unit
In the initial display, select “Menu” → “Settings” →
“General Settings” → “LCD Contrast”.
■ Selecting the menu language
(Language)
• English (Default): Select this setting to display the
menus in English.
• Japanese: Select this setting to display the menus in
Japanese.
• Chinese: Select this setting to display the menus in
Chinese.
Using the keys on this unit
In the initial display, select “Menu” → “Setup” →
“General Settings” → “Language”.
Using the Web menu
In the Web menu, select “Language”.
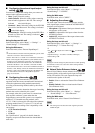
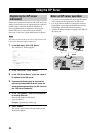
■ Setting the date and time manually
Set the time and date of the built-in clock of the system
manually. For details, see “Setting the Date and Time”
(page 22).
Using the keys on this unit
In the initial display, select “Menu” → “Setup” →
“General Settings” → “Time”.
■ Setting the time zone
Set the time zone of the region in which the system is
used. The time zone should be set in ±1-hour steps with
respect to the UTC (Coordinated Universal Time).
Using the Web menu
In the Web menu, select “Time”.
■ Setting the daylight saving time
If the region in which the system is used applies the
daylight saving time system, set this item to “ON”. This
item is usually set to “OFF”.
Using the Web menu
In the Web menu, select “Time”.
■ Selecting the SNTP server for
synchronization
If you want to adjust the time automatically by
synchronizing this unit with an SNTP server, enter the
name or IP address of the desired SNTP server. See
“Setting the Date and Time” (page 22) for details.
Using the Web menu
In the Web menu, select “Time”.
■ Selecting the SNTP synchronization
interval
If you want to adjust the time automatically by
synchronizing this unit with an SNTP server, specify the
synchronization interval in minutes. See “Setting the Date
and Time” (page 22) for details.
Using the Web menu
In the Web menu, select “Time”.
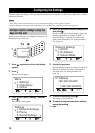
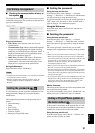
Configuring the general settings
1
2
3
4
5
6
7
8
9
0
MIC MUTE
VOL
1
2
3
1
2
3
4
5
6
7
8
9
0
MIC MUTE
VOL
1
2
3
4
5
6
7
8
9
0
MIC MUTE
VOL
1
2
3
4
5
6
7
8
9
0
MIC MUTE
VOL
1
2
3
4
5
6
7
8
9
0
MIC MUTE
VOL
1
2
3
4
5
6
7
8
9
0
MIC MUTE
VOL