


SETTING UP YOUR PHONE
Page 11 of 31
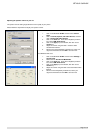
Configuring your SKYPE Phone
For phones with single country and language setting, you can skip this section.
For phones with supporting multiple countries,
After powering up the phone, your phone welcomes you with an animated screen displaying and a welcome message.
1. When the handset has established a link with the base, press any key on the handset.
2. Select the desired country and press the OK.
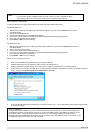
Registering your handset
You will need to register your handset if it shows UNREGISTERED in the display after you followed the configuration steps above or if you
wish to de-registered from its original base and register the handset to a different base unit.
To register your handset:
1. Press MENU.
2. Select ADVANCED SET and press OK. If your handset’s current status is UNREGISTERED, you will be taken directly to the next
step.
3. Select REGISTRATION and press OK.
4. Before you enter the PIN, press and hold PAGING key on the base for 4 seconds. The base is now in the registration mode and
both LEDs on the base will be blinking. (If the base is full and cannot take on any more handset, you will not be able to register.
See Section 9 Deleting a handset – to delete a currently registered handset.)
5. Enter the PIN on the handset and press OK.
During the registration period, you will see BASE SEARCH on the handset.
You will hear a confirmation tone if the registration is successful. The handset label, the handset number, and the clock will be displayed.
The status icon will be shown as well if PC is setup properly and connected with the base. If the registration is not successful, the
previously unregistered handset will display UNREGISTERED again. If the handset is previously registered to another base, the handset
will connect back to its original base. Follow the procedure above and try again.
Set your handset’s clock
Once the base is powered up and connected to the PC and the USB driver is running, your handset will obtain the current time from the
PC.
However, you can still adjust the clock manually.
To adjust your clock:
1. Press MENU during standby.
2. Press Up or Down to select CLOCK/ALARM, and then press OK.
3. Press Up or Down to select SET CLOCK, and then press OK.
4. Use numeric keys to enter the time for the clock in 24 hours format.
5. Press OK to confirm.
Note: If you bought your product in any of the above countries but want to use it in another one, you can select the
country in the menu to activate the right country settings. Nevertheless, you have to change the telephone line
cord and adapter according to the country in which you want to use it.