


~41~
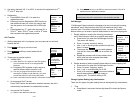
(3) View Number: press “3” to view the complete number if the phone
number is longer than 14 digits.
b. Press “2” to view the last 10 phone numbers received, starting from
the most recent one. Use ¿orÀ to scroll through the list. Press
OPTION for options.
(1) Erase: press “1” and confirm to erase the current record.
(2) Save: press “2” to edit and save or save without editing into the
phonebook.
(3) View Number: press “3” to view the complete number if the phone
number is longer than 14 digits.
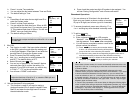
(4) No entries: the LCD displays “No entries” if there is no “Received call
logs”. Please note that you need to subsribe to Caller ID service from
your local teleco to facilitate this function.
c. Press “3” to view the last 10 phone numbers received but didn’t
answer, starting from the most recent one. Use ¿orÀ to scroll
through the list. Press OPTION for options.
(1) Erase: press “1” and confirm to erase the current record.
(2) Save: press “2” to edit and save or save without editing into the
phonebook.
(3) View Number: press “3” to view the complete number if the phone
number is longer than 14 digits.
(4) No entries: the LCD displays “No entries” if there is no “Missed call
logs”. Please note that you need to subsribe the Caller ID service from
your local teleco to facilitate this function.
d. While viewing any of the three call logs, press DIAL to dial the
phone number.
Notes:
1. Only phone numbers are stored in the three call logs. Intercom calls
are not recorded.
2. Caller ID service is required from your local phone company in order
to receive phone numbers, names and time stamps on incoming
calls. The Received and Missed Call Logs will register no incoming
calls if Caller ID service is not available.
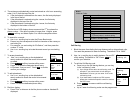
5. Press “4” to set sound-related settings:
a. Press “1” to select ringer volume: use ¿orÀ to scroll through 6
options: Medium, Low, Off, Vib-then-Ring, Vibrate and High. Press
SAVE to save selection. Default = Medium.
b. Press “2” to select ringer tone: use the ¿orÀ to scroll through 4
options: 0, 1, 2, and 3. Press SAVE to save selection. Default = 0.
c. Press “3” to select key volume when a key is pressed: use ¿orÀ to
~42~
scroll through 3 options: High, Low, and Off. Press SAVE to save
selection. Default = Low.
d. Press “4” to select key tone: use the ¿orÀ to scroll through 4
options: 0, 1, 2, and 3. Press SAVE to save selection. Default = 0.
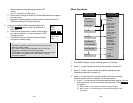
6. Press “5” to change handset settings:
a. Press “1” to set dialing prefix:
(1) Use ¿orÀto scroll and select to turn on or off the dialing prefix feature.
Default = Off.
(2) If “On” is selected, the handset is prompted to enter a prefix, up to 14
digits.
(3)
Use Delete and ¿orÀ scrolling key to edit prefix.
(4) When this feature is turned on, the LCD will prompt the user on each
outgoing phone call except during redial or dialing by pressing the
TALK key first whether to use the dialing prefix. The current prefix is
also displayed. Press Yes or No soft key to add the prefix to the
beginning of the number.
(5) This feature is useful for access code, calling card, and credit card
calls, etc.
b. Press “2” to Group Select: see Handset Group Subscription on page
30.
c. Press “3” to select language
(1) Use ¿orÀ to select English, French, or Spanish. The default setting is
English.
(2)
Press SAVE to confirm your selection.
d. Press “4” to clear call logs and phonebook:
(1) Press ‘1” and confirm to delete the entire phonebook.
(2) Press “2” and confirm to clear the three call logs (Called,
Received, and Missed).
e. Press “5” to change the power-up LCD display to show, e.g.,
company name or other greeting message:
(1) Use ¿orÀ to move the cursor backward or forward to insert (to the left
of the cursor) or delete (the character above the cursor, or left of the
cursor if cursor is on the right of the last character).
(2) Enter characters using the Character Table and method discussed in
the Phonebook section.
(3)
When finished; press SAVE to save change.
f. Press “6” to change LCD display contrast:
(1) Use ¿orÀ to scroll through values 1 to 16. Pick one that is most
suitable to you. Default = 10.
(2)
When finished; press SAVE to save change.
g. Press “7” to change the LCD backlight: