


Putting the receiver into operation
9
Putting the receiver into operation
Preparing the receiver for use
Setting up the receiver on a flat surface
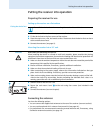
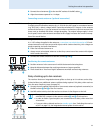
Fitting the device feet
̈ Clean the base of the receiver where you want to fix the device feet.
̈ Fit the device feet to the four corners of the receiver.
̈ Place the receiver on a flat, horizontal surface. Please note that the device feet can leave
stains on delicate surfaces.
̈ Connect the antennas (see page 9).
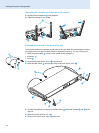
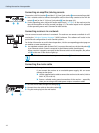
Mounting the receiver into a 19” rack
̈
Slide the receiver into the 19” rack.
̈ Secure the rack mount “ears” ³ to the rack using four screws (not included in the
delivery).
̈ Connect the antennas (see next chapter).
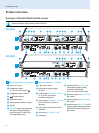
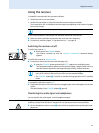
Connecting the antennas
You have the following options:
• You can connect the supplied rod antennas to the rear of the receiver (see next section).
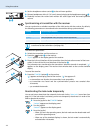
• You can use the optional AM 2 antenna front mount kit (see page 10).
• For professional use, we recommend connecting remote antennas and, if necessary, using
Sennheiser antenna accessories (see page 11).
Do not fit the device feet when mounting the receiver into a 19” rack.
CAUTION! Risks when rack mounting the receiver!
When installing the device in a closed or multi-rack assembly, please consider that, during
operation, the ambient temperature, the mechanical loading and the electrical potentials will
be different from those of devices which are not mounted into a rack.
̈ Make sure that the ambient temperature within the rack does not exceed the permissible
temperature limit specified in the specifications.
̈ Ensure sufficient ventilation; if necessary, provide additional ventilation.
̈ Make sure that the mechanical loading of the rack is even.
̈ When connecting to the power supply, observe the information indicated on the type
plate. Avoid circuit overloading. If necessary, provide overcurrent protection.
̈ When rack mounting, please note that intrinsically harmless leakage currents of the indi-
vidual mains units may accumulate, thereby exceeding the allowable limit value. As a
remedy, ground the rack via an additional ground connection.
PEA
-1
40
30
20
10
-2
-3
-4
A
RF
³