IP 300 User Manual
7
INSTALLING THE IP PHONE
Before installing your IP Phone, it is useful to know what kind of IP addressing your
LAN or router is using.
A. What is the IP Addressing of your network?
Most networks, including the Internet, use identification codes called IP (Internet
Protocol) addresses to identify and locate the devices that share their services.
There are two systems for assigning these addresses:
•
DHCP Addressing: With this system, your LAN or router automatically
assigns all the required IP parameters to any device connected to it when the
device logs on. (Some ISPs who use DHCP require a host name, which must
be entered manually.)
Note: Your IP Phone is shipped from the factory with DHCP on, or
enabled. So, if your LAN or router is configured to use DHCP addressing, your
IP Phone’s LAN parameters will automatically be configured as soon as it is
connected to the LAN or router and powered up.
•
Static Addressing: If your LAN does not use DHCP addressing, each device
concurrently connected to it must be assigned its own unique IP address. In
this case, your LAN’s configuration information must be manually entered into
the IP Phone. You will need to know the following parameters:
• IP address
•
Subnet mask
• Gateway address
• Primary DNS address
• Secondary DNS address (required by some systems)
Note: If your system uses static addressing, this is a good time to make sure
you know these parameters, since you will need them to configure your IP
Phone. If you don’t know them, contact your network administrator to obtain
the necessary information.
B. Connecting the Handset and Cables
Connect the LAN and power cables to the IP Phone as follows:
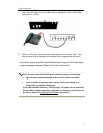
1. Connect handset to base: insert handset cord into handset cord jack at the
left side of the base.
2. Connect IP phone to Internet: plug the RJ-45 Ethernet cable into the Ethernet


