


NetComm VoIP WiFi Phone V24W User Guide
2. Access the Router’s Web-based Utility by going to http://192.168.1.1 or
the IP address of the Router.
3. A login screen will appear. Leave the User Name field blank. Enter the
Router’s password (the default is admin) in the Password field. Then
click the OK button.
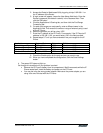
4. Click the Applications & Gaming tab, and then click the Port Range
Forwarding tab.
5. For each port range you must specify, enter a different name in the
Application field. Then enter the number or range of external port(s) used
by the IP Phone.
6. Select the protocol you will be using, UDP.
7. Enter the IP address of the IP Phone. For example, if the IP Phone’s IP
address is 192.168.1.100, you would enter 100 in the field provided.
8. Repeat steps 5-7 until you have entered all four port ranges for the IP
Phone.
Application Start and End Protocol IP Address
Enable Internet Phone 1 5060 to 5061 UDP IP address of IP Phone
X Internet Phone 2 53 to 53 UDP IP address of IP Phone
X Internet Phone 3 69 to 69 UDP IP address of IP Phone
X Internet Phone 4 10000 to 20000 UDP IP address of IP Phone
9. Check the Enable option for the port services you want to use.
10. When you have completed the configuration, click the Save Settings
button.
4. The power LED does not light up.
Go through this checklist until your problem is solved:
• Remove the IP Phone’s battery from its compartment. Wait five seconds while the IP
Phone resets itself. Insert the battery and power on the IP Phone.
• You may be using the wrong power adapter. Make sure the power adapter you are
using is the one included with the IP Phone.
YML873 V24W User Guide - 38