


Operations Guide 930500E CyberData Corporation
30
Installing the VoIP V3 Indoor Intercom
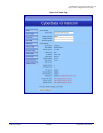
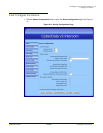
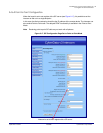
Configure the Network Parameters
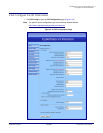
2. On the Network Configuration page, enter values for the parameters indicated in Table 2-8.
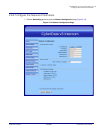
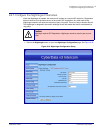
3. After changing the parameters, click Save Settings. This updates the changed parameters and
reboots the Intercom if appropriate.
4. Connect the Intercom to the target network.
5. From a system on the same network as the Intercom, open a browser with the new IP address
of the Intercom.
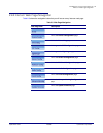
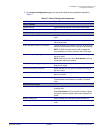
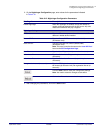
Table 2-8. Network Configuration Parameters
Web Page Item Description
Stored Network Settings
IP Addressing Select either DHCP IP Addressing or Static IP Addressing by
marking the appropriate radio button. If you select Static, configure
the remaining parameters indicated in
Table 2-8. If you select DHCP,
go to Step 3.
IP Address Enter the Static IP address.
Subnet Mask Enter the Subnet Mask address.
Default Gateway Enter the Default Gateway address.
DNS Server 1 Enter the DNS Server 1 address.
DNS Server 2 Enter the DNS Server 2 address.
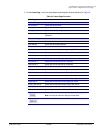
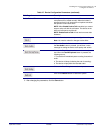
DHCP Timeout
DHCP Timeout in seconds Enter the desired timeout duration (in seconds) that the device will
wait for a response from the DHCP server before defaulting back to
the stored static IP address.
Note: A value of -1 will cause the device to retry indefinitely and a
value of 0 will cause the device to reset to a default of 60 seconds.
Current Network Settings Shows the current network settings.
IP Address Shows the current Static IP address.
Subnet Mask Shows the current Subnet Mask address.
Default Gateway Shows the current Default Gateway address.
DNS Server 1 Shows the current DNS Server 1 address.
DNS Server 2 Shows the current DNS Server 2 address.
Click the Save button to save your configuration settings.
Note: You need to reboot for changes to take effect.
Click on the Reboot button to reboot the system.