


20
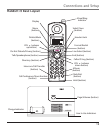
Connections and Setup
5. Press the Sel/Save button.
6. Use the Vol (+ or -) buttons to scroll up or down to YES or NO. The default is YES.
7. Press the Sel/Save button to save.
Contrast
Time and Date
1.
The time and date is automatically set when you receive the rst CID call. To manually
reset the time and date, follow the steps below.
1. Press the Menu button while in standby mode.
2. Use the Vol (+ or -) buttons to scroll up or down to TIME & DATE.
3. Press the Sel/Save button.
4. Use the Vol (+ or -) buttons to scroll up or down to CLOCK.
5. Press the Sel/Save button, and the cursor moves to the hour eld.
6. Use the Vol (+ or -) buttons to scroll up or down to select the hour.
NOTE: AM or PM will be set accordingly with selected hour.
7. Press the CID button, and the cursor moves to the minute eld.
8. Use the Vol (+ or -) buttons to scroll up or down to select the minutes.
9. Press the CID button, and the cursor moves to the month eld.
10. Use the Vol (+ or -) buttons to scroll up or down to select the month.
11. Press the CID button, and the cursor moves to the day eld.
12. Use the Vol (+ or -) buttons to scroll up or down to select the day.
13. Press the CID button, and the cursor moves back to the hour eld.
14. Press the Sel/Save button.
Hour Format
You may set this phone to a 12 or 24-hour format. The default is 12-hour format.
1. Press the Menu button while in standby mode.
2. Use the Vol (+ or -) buttons to scroll up or down to TIME & DATE.
3. Press the Sel/Save button.
4. Use the Vol (+ or -) buttons to scroll up or down to HOUR FORMAT.
5. Press the Sel/Save button.
Press Menu button once, then press the VOL ( or ) buttons until
CONTRAST is displayed.
2. Press Select/Save button to select
3. Use the VOL ( or ) buttons to select the LCD contrast level.
4. Press the Select/Save button to save.