


a
75
9
Initial set-up
There is no special hardware set-up involved infrared transfers.
And if you only want to transfer single entries using [2nd] [GET]
and [2nd] [SEND], there is no software set-up either: all you
have to do initially is set up the units properly so they use the
same path (step 4 below). For all other infrared transfers, follow
the procedure below.
1. Press [MENU] four times on both units to open the
PERIPHERALS menu.
2. Select SELECT PORT.
A submenu opens.
3. Select IR.
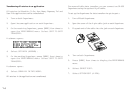
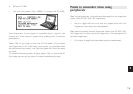
4. Place the two Organizers so that their infrared ports are
facing each other and are no more than 80 cm apart.
* During transfers, do not leave the cover more than three-
quarters open or it will interrupt the infrared transfer.
* When transferring entire applications or files, or entries
marked as secret, both Organizers must be unlocked (see
p.83).
* Avoid direct sunlight.
* Keep the infrared port clean with a soft, dry cloth. Dust on
the port could cause a transfer to fail.
* Although infrared transfer requires no special hardware,
it is easily affected by ambient conditions and other factors
such as external light, weak batteries, large transfer
distance, transfer angle, etc. As a result, while infrared
transfer is very convenient, there is a strong likelihood of
data transfer failure, incomplete data transfer (missing
data) or other errors occurring. It is therefore
recommended that you check the received data
thoroughly after making an infrared transfer.
Transfer single entries
Single entries can be transferred in all applications.
1. Turn on both Organizers.
2. On the sending Organizer, select the entry you want to
send.
3. Press [2nd] [GET] on the receiving Organizer.
4. Press [2nd] [SEND] on the sending Organizer.
The selected entry is transferred and appended to data in the
appropriate application.
* You can also transfer single entries using UNIT TO UNIT
TRANSFER in the PERIPHERALS menu. In step 3, after
opening the same application as on the sending Organizer,
select GET DATA (APPEND) on the receiving Organizer.
Then, in step 4, select SEND SELECTED ENTRY on the
sending Organizer.