


The function is opened via the application bar. Select the [Backup/Restore] icon with the mouse, or
alternatively you can select the ‘Backup/Restore’ menu option in the ‘View’ menu.
Although the backed up data is stored in compressed form in Organizer Link 4, you may require
some space on your hard disk which is why you must decide how many backups Organizer Link 4
should keep stored. The corresponding setting can be found in the ‘Backup/Restore application’
above the list field.
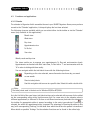
Backing up data
1 Click on [Backup].
2 Then enter a comment. This should enable you later to identify the backup clearly, so you
should choose the comment text accordingly.
3 Organizer Link 4 now starts the data backup.
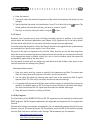
Restoring data
1 In the list field of the application, select the backup you want to restore to the SHARP
Organizer.
2 Click on the [Restore] button.
3 Organizer Link 4 starts restoring the data to the SHARP Organizer.
4.5 Data synchronisation
SHARP Organizers with synchronisation capabilities can be synchronised using Organizer Link 4
i.e. your data in Organizer Link 4 is co-ordinated with that on your SHARP Organizer.
Synchronisation therefore has immense advantages over the conventional functions ‘Send to
organizer’ and ‘Receive from organizer’. Please note that it crucial to avoid performing both data
synchronisation and conventional data transfer (sending and receiving) for the same databases,
otherwise there is a risk of duplicates being created.
From version 2.0 of Organizer Link 4, synchronization can also be performed with Microsoft Out-
look (from Version 98). In this case, you can define whether the synchronization is to be with data
from Organizer Link 4 or directly with data in Microsoft Outlook separately for each data area in
the SHARP Organizer in the ‘Synchronization’ in the menu item ‘Settings’ in the ‘File’ menu. In the
‘Outlook’ tab of the settings dialogue box, you can, if required, determine with which folder in
Microsoft Outlook the synchronization is to take place. For a detailed description and more
information regarding the settings options, please refer to the online-help.
Start a synchronisation process via the menu option ‘Synchronise’ in the ’Link’ menu or via
the icon in the toolbar. During the process a status window is displayed in which you can see
the individual steps and, if necessary, cancel the synchronisation.
Please note:
Cancelling synchronisation may mean that it is impossible to restore the initial status of the
data. Therefore, after cancelling, perform a new synchronisation as soon as possible so that the
data on both sides are co-ordinated again.
Organizer Link 4
28