


Preparation
11
Battery installation and
replacement
Important:
L Use the supplied rechargeable batteries.
L When installing the batteries:
– Wipe the battery ends (S, T) with a dry
cloth.
– Avoid touching the battery ends (S, T) or the
unit contacts.
– Ensure correct polarities (S, T).
L When replacing the batteries:
– USE ONLY rechargeable Ni-MH batteries
AAA (R03) size.
– Do NOT use Alkaline/Manganese/Ni-Cd
batteries.
– We recommend using the Panasonic
rechargeable batteries noted on page 3, 5.
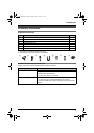
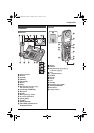
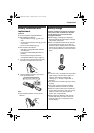
1 Press the notch on the handset cover firmly,
and slide it in the direction of the arrow.
2 Insert the batteries negative (T) end first.
Close the handset cover.
Note:
L When replacing batteries, remove the old
batteries.
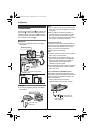
Battery charge
Place the handset on the charger for about 6
hours before initial use. Make sure the base
unit AC adaptor cord is connected while
charging the batteries.
L While charging, “Charging” is displayed.
When the batteries are fully charged, “Charge
completed” is displayed.
L When you install the batteries for the first time,
set the date and time (page 12) to allow the
handset to display charging status. If the battery
level is too low to allow you to set the date and
time, charge the batteries for a short time and try
again.
Note:
L If “missed call” is displayed on the handset
while charging, there are missed calls in the
caller list. After viewing all missed calls,
“Charging” or “Charge completed” is
displayed.
L It is normal for the handset to feel warm during
charging.
L If you want to use the handset immediately,
charge the batteries for at least 15 minutes.
L Clean the charge contacts of the handset and
charger with a soft and dry cloth once a month.
Clean more often if the unit is exposed to
grease, dust, or high humidity.
L While charging the batteries, make sure the
handset and charger are within range of the
base unit (where w is not displayed on the
handset display).
Rechargeable Ni-MH ONLY
TG3651BX(e).book Page 11 Monday, May 31, 2010 8:51 AM