


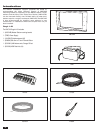

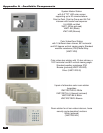

12
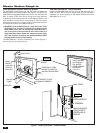
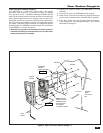
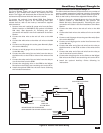
VMC1VDS-S/BZ Door Station Rough-in
The VMC1VDS-S and VMC1VDS-BZ incorporate a wide angle
120 degree horizontal viewing camera into a Door Station. It
is normally mounted at a height from the fl oor of: 55” – 60”.
Installation of this unit on an exterior wall requires 4 screws
and anchors (See Figure 6). When installing these units, be
aware of the camera location and the direction of sunlight and
other ambient light. Direct sun or light pointed into the lens of
the VMC1VDS camera may impact video quality. Additionally,
exposure to extreme weather conditions is not recommended.
For added protection against weather, the VMC1VDS-S and
VMC1VDS-BZ should be equipped with a DSWS weather
shield. The installation of the DSWS is provided in the VMC1
Finish Out Guide.
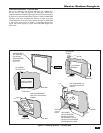
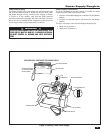
Figure 5. VMC1VDS-S/BZ Door Station Rough-In
Door Station Rough-In
7-3/4”
3-1/2”
USE INNER HOLES FOR
MOUNTING ROUGH-IN
ENCLOSURE TO STUD
CAT5 CABLE LOOPED
WITH EXCESS AMOUNT
PRE-DRYWALL COLOR VIDEO DOOR
STATION
DRYWALL
GRILLE
ELECTRONICS
PANEL
ANCHORS
COLOR VIDEO DOOR
STATION WALL
MOUNTING PLATE
BEZEL
POST-DRYWALL COLOR
VIDEO DOOR
STATION
VMC1VDS-BZ
VMC1VDS-S
VMC1VDS-BZ
VMC1VDS-S
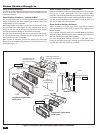
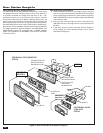
VMC1HR
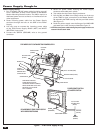
VMC1HR Rough-in Enclosure
1. Attach the VMC1HR fl ush to the exterior wall using the
two inner pre-punched holes in the VMC1HR. The outside
holes on the wings of the box are to be used to mount the
VMC1VDS-S/BZ and not to be used to attach the VMC1HR
to the exterior wall.
2. Pull the Cat-5 wires through the hole in the back of the
VMC1HR and loop it through so they do not fall back into
the wall.
3. If the door strike or Chime activated Control Output is
to be utilized, see “Door Release Rough-in and “Chime
Activated CO Rough-in