


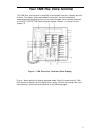
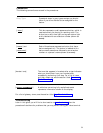


9) Two-level feature
buttons
10) Volume control
button
11) Select button
1)
2)
3)
4)
12) Transfer button
13) Dial pad
14) Hold button
15) Drop/Test
button
16) Conference/Ring
button
17) Message light
Each of these 6 buttons accesses 2 features, one printed
on the top half of the label and one printed on the
bottom half of the label. You can access the top feature
by pressing [
Select ] and then the feature button.
For adjusting the volume of the built-in speakerphone
when you are using the speakerphone and a call is in
progress, or for adjusting the volume of the tone ringer
when you are not using the speakerphone.
Can be used in 4 different ways:
Used with a 2-level feature
-
button to access the
top-labeled feature;
Used with [
Drop Test
] , to initiate a self-test of your
voice terminal;
Used with [
Conference Ring
] , to select your own
personalized ring from among 8 available patterns;
Used with [
Speaker Reset Spkr
] , to perform an
acoustic test of the environment and adjust the
speakerphone to the surrounding acoustic
environment for optimal performance.
For transferring a call to another voice terminal.
The standard 12-button pad for dialing phone numbers
and accessing features. The letters, "Q" and "Z," have
been added to the appropriate dial pad keys for
directory access, and the "5" button on your dial pad has
raised bars for visually-impaired users.
For putting a call on hold.
For disconnecting from a call or dropping the last party
added to a conference call. When used with [
Select ] ,
you can perform a self-test of your voice terminal button
lights and tone ringer.
For setting up conference calls. When used with
[
Select ] , you can select a personalized ringing pattern
for your voice terminal.
A red light which goes on steadily when a message has
been left for you.
3