


11
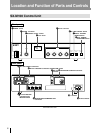
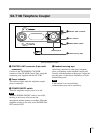
5 Input connector (D-sub 15-pin) (for SX-
C150/SX-D150 only)
Connect to the DELEGATE’S/CHAIRMAN’S
UNIT connector of the SX-M100 Control Unit,
SX-E120 Expansion Board (not supplied) or the
output connector of another chairman’s unit/
delegate’s unit.
6 Voting connector
Connect to the SX-CV10/SX-DV10 voting unit
(not supplied).
For details, contact your Sony dealer.
7 PRIORITY button and indicator (for the
SX-C100A/SX-C150 only)
Press this button to disconnect the microphones of
the delegate’s units and enable the use of only the
microphone of the chairman’s unit.
Holding down this button turns on the microphone
of the chairman’s unit.
8 MIC ON/OFF button and indicator
SX-C100A/SX-C150: Pressing this button turns
the microphone on. The MIC ON/OFF button
indicator and microphone indicator
2 light.
Pressing this button again turns the microphone
off. The indicators go out.
SX-D100A/SX-D150: When the MIC LIMIT ON/
OFF button on the control unit is set to OFF
(the MIC LIMIT ON/OFF button indicator does
not light), pressing this button turns the
microphone on. The MIC ON/OFF button
indicator and microphone indicator
2 light. In
this mode, since the number of speakers is not
limited, the microphones of all the delegate’s
units are enabled.
When the MIC LIMIT ON/OFF button on the
control unit is set to ON (the MIC LIMIT ON/
OFF button indicator is lit), the number of
speakers is limited. Thus, when the MIC ON/
OFF buttons of more than six delegate’s units
are pressed at the same time, the indicator of
the sixth delegate’s unit blinks (for about 3
seconds) to tell the user that the microphone
cannot be enabled since the number of units
whose MIC ON/OFF button is pressed exceeds
six.
The explanations given here apply to both units,
unless noted otherwise, with the exception of
PRIORITY button
7.
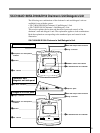
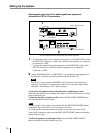
1 Output connector
For SX-C100A/SX-D100A (20-pin multi-
connector)
Connect the cable with a 20-pin multi-connector of
the chairman’s unit/delegate’s unit placed opposite
the SX-M100 Control Unit and the next
chairman’s unit/delegate’s unit.
For SX-C150/SX-D150 (D-sub 15-pin)
Connect to the input connector on the next
chairman’s unit and delegate’s unit.
2 Microphone and microphone indicator
The microphone can be rotated freely. The
microphone operation depends on the setting of the
MIC ON/OFF button
8.
For details, see the explanation of the MIC ON/OFF
button 8.
3 Speaker
The sound is heard through this speaker when the
microphone is not being used and when an
earphone is not plugged into the earphone jack.
The speaker’s volume is adjusted from the
SX-M100 Control Unit. To prevent howling,
nothing is output from the speaker when the
microphone of the chairman’s/delegate’s unit is
enabled. Also at the same time, the speaker volume
of the units on either sides of the unit is
automatically reduced.
4 VOL (volume) control
Adjusts the volume of the earphone. Even if the
VOLUME control is turned fully
counterclockwise, the earphone volume cannot be
turned off. (The speaker volume is not affected by
this control.)
5 Cable with 20-pin multi-connector (for
the SX-D100A/SX-C100A only)
Connect to the DELEGATE’S/CHAIRMAN’S
UNIT connector of the SX-M100 Control Unit,
SX-E120 Expansion Board (not supplied) or the
output connector of another chairman’s unit/
delegate’s unit.