


X
SMS (Short Message Service)
32
Erasing received messages
1
While reading a received message,
press ".
2 “Erase” i #
L To erase all messages in the selected
mailbox, select “Erase All”. i
#
3 “Yes” i # i {ih}
Storing the sender’s number in
the handset phonebook
1
While reading a received message,
press ".
2 “Add Phonebook” i #
3 Continue from step 3, “Adding entries to
the handset phonebook”, page 17.
Editing the sender’s number
before calling back
1
While reading a received message,
press ".
2 “Edit and Call” i #
3 Edit the number. i {C} / {s} / #
SMS settings
Creating private mailboxes
Private mailboxes can be used for sending
and receiving SMS messages. Each private
mailbox is password protected.
1 " (middle soft key) i X i #
2 “Public” i #
3 “Settings” i #
4 “Private Mailbox” i #
5 Select the desired new mailbox number
(“Mailbox1” to “Mailbox6”). i #
6 Enter a name for the mailbox (5
characters max.; page 39). i #
7 Enter a 4-digit password for the mailbox.
i #
8 “Save” i # i {ih}
Note:
L To receive SMS messages using a
mailbox, inform others of your mailbox
number.
L If you forget the password assigned to a
mailbox, consult your nearest Panasonic
service centre.
Changing private mailbox
settings
You can change the password or name of
the private mailbox and erase the mailbox.
1 " (middle soft key) i X i #
2 “Public” i #
3 “Settings” i #
4 “Private Mailbox” i #
5 Select the desired mailbox name. i
# 2 times
6 Enter the mailbox’s 4-digit password.
7 Edit the mailbox name (5 characters
max.; page 39). i #
L To erase the mailbox, press and hold
{C/T}. i # i “Yes” i #
i {ih}
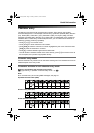
SMS settings Page
SMS on/off (default: “On”) page 29
Message Centre 1 page 29
Message Centre 2 page 29
Private mailboxes
(default: —)
page 32
PBX line access number
(default: “Off”)
page 33
TG1861AL(e).book Page 32 Friday, March 31, 2006 3:28 PM