


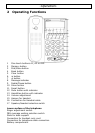

-Operation-
3 Installation
3.1 Safety information
NOTE! Before installation, it is essential that you read the general information at
the beginning of this user guide.
3.2 Check contents of pack
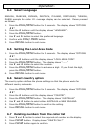
The following items are supplied in this pack:
One telephone base One handset
One telephone line cord One curly cord
One modular adaptor plug (Aus only) This user guide
One desk support Three AAA batteries
One warranty card
3.3 Installing the batteries
Install the 3 AAA batteries (supplied) before connecting your telephone to the
telephone network. The battery is required for the display, handsfree and other
functions of the telephone.
1. Make sure that the telephone is not connected to the telephone network.
2. Locate the battery compartment on the underside of your telephone.
3. Open the battery compartment with a pen tip or a pointed object.
4. Insert the battery, ensuring that the polarity is correct.
5. Close the battery compartment.
The LCD display may not display until you are connected to a telephone line and
pick up the receiver. This is for protecting the telephone memory while replacing
battery. See section 3.5 for procedure of connecting the phone line.
The battery should be changed when the icon is displayed on the LCD. If
the battery becomes completely discharged, you could lose the stored numbers.
Do not use rechargeable batteries, as these could possibly lead to a short circuit.
When replacing the batteries use only AAA 1.5V alkaline batteries.
WARNING
Do not throw batteries into fire or immerse in water. Do not dispose of
old or faulty batteries with the normal household waste.