


9
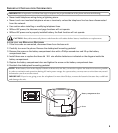
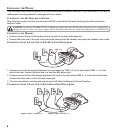
SYSTEM VERIFICATION
The following procedures should be used to test the system’s configuration and identify possible line connection
errors. The phone must be connected to the AC power outlet, Line 1 must be connected to the LINE 1 + 2 jack, and
the phone must have a phone ID (Station ID) number.
VERY IMPORTANT: In order to achieve full system operation (i.e. intercom, page, etc.), Line 1 must be connected and
must be common to all phones connected to the system. Only other 29487 or 29488 models are compatible for full system
operation.
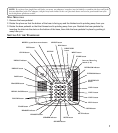
OTHER STATIONS
1. Press LINE 1.
2. Look at all the other stations. If they all indicate line 1 is being used, the connection is correct.
OR
1. Press the INTERCOM button. The display shows
INTERCOM
and
ENTER CALLING PHONE ID
.
2. Enter a station ID by pressing an Intercom/Memo Log button (1-16). The display shows the station you entered. If
the station you entered is connected to the system, you will hear a ring back tone (call through tone) at your
phone. If the station is not connected to the system, you will hear an error tone.
NO ANSWER
shows in the
display and intercom is cancelled.
SETTING UP THE CLOCK
PROGRAMMING THE HOUR FORMAT
The clock is capable of being set to a 12- or 24-hour format. The default is 12-hour mode.
1. Press the MENU button.
2. Press the REVIEW down button to scroll to
SET ADVANCE FEATURE
.
3. Press the SELECT button.
SET HOUR FORMAT
is displayed.
4. Press the SELECT button again.
5. Use the REVIEW up or down buttons to select
12-HOUR
or
24-HOUR
.
6. Press the SELECT button to confirm.
SETTING THE TIME
1. Press the MENU button.
SET TIME & DATE
is displayed.
2. Press the SELECT button.
HOUR
1. Use the REVIEW up or down button to select the desired hour.
2. Press the SELECT button to confirm. You are now ready to select the minutes.
MINUTES
1. Use the REVIEW up or down button to select the desired minute.
2. Press the SELECT button to confirm. You are now ready to select the month.
MONTH
1. Use the REVIEW up or down button to select the desired month.
2. Press the SELECT to confirm. You are now ready to select the date.