


8
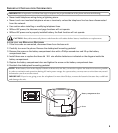
SETTING A PHONE ID (STATION ID)
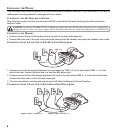
When the Line 1 telephone cord and AC power supply cords are properly installed, the unit automatically searches
and sets up a Phone ID (Station ID) which shows in the display. To set your own Phone ID, or change your phone ID,
follow the menu options, or press EXIT to start using the phone.
NOTE:
• If the phone cannot find an ID, determine if there are too many phones connected to the system. A maximum of 16
phones can be connected in the system.
• The Phone ID (01 to 16) is unique. When more than one phone using the same Phone ID is detected, only one phone
with that ID will be valid. The phone IDs for the other phone(s) is automatically erased, and the phone(s) intercom
indicators blink red and green. You must use the Menu options to select a new Phone ID for each phone.
SETTING THE PHONE NAME
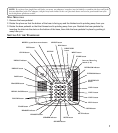
1. Press the MENU button.
2. Use the REVIEW up or down buttons to scroll to
SET PHONE OPTIONS
.
3. Press the SELECT button.
4. Use the REVIEW up or down buttons to scroll to
SET PHONE NAME
.
5. Press the SELECT button.
SET PHONE NAME
is displayed.
6. Use the number pad to enter your name (up to 8 characters). More than one letter or character is stored in each of
the number keys. For example, to enter letter "A", press the 2 key once. For a "B", press the same key twice. For a
"C", press three times.
7. Use the REVIEW up or down button to move the cursor.
NOTE: Press CLEAR to delete an incorrect letter.
8. Once the desired letter is selected,
• use the REVIEW down button to move to the next letter, or
• press the next character if the character is a different dial button, or
• wait a couple of seconds for the phone to automatically advance to the next character position.
9. When finished, press the SELECT button again.
OK
is displayed.
NOTE: The Phone Name and ID are displayed when phone is idle.
CHANGING A PHONE ID (STATION NUMBER)
1. Press the MENU button.
2. Use the REVIEW up or down button to scroll to
SET PHONE OPTIONS
.
3. Press the SELECT button.
4. Use the REVIEW up or down buttons to scroll to
SET PHONE ID
.
5. Press the SELECT button.
6. Select the new ID by pressing the corresponding memory location button (1-16) or press the SELECT button to
automatically search and set the ID.
NOTE: You may press the EXIT button at any time to exit except after ID searching starts.