


4-17
Cisco Unified IP Phone Administration Guide for Cisco Unified CallManager 4.2, Cisco Unified IP Phone
OL-8617-01
Chapter 4 Configuring Network Settings on the Cisco Unified IP Phone
Configuring IP Settings
Using the Phone Network Configuration Screen
Procedure
Step 1 Display the Network Configuration menu.
For instructions, see the “Displaying the Network Configuration Menu” section
on page 4-4.
Step 2 Unlock Network Configuration menu options.
For instructions, see the “Unlocking and Locking Options on the Network
Configuration Menu” section on page 4-5.
Step 3 Scroll to DHCP Address Released.
If the DHCP address is currently assigned, the option appears as
DHCP Address Released NO
Step 4 Press the Yes softkey to release the DHCP-assigned IP address.
Step 5 Press Save.
The phone remains in an idle state, without an IP address assigned, until you do
one of the following actions:
• Manually assign an IP address.
• Set DHCP Address Released back to No.
• Power cycle the phone, which enables all default settings, including enabling
DHCP.
Related Topics
• Enabling DHCP, page 4-13
• Disabling DHCP, page 4-15
• Configuring IP Settings, page 4-17
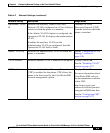
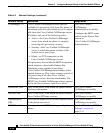
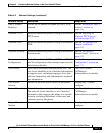
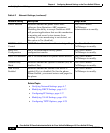
Configuring IP Settings
Use these guidelines when manually configuring the IP settings: