


AXIS P3365-V Fixed Dome Network Camera
Access the Product
Click the View Full Screen button and the video image will ll the entire screen. Press ESC (Escape) on the computer
keyboard to cancel full screen view.
The Record button is used to record the current video stream on your computer. The location where the recording is saved
can be specied in the AMC Control Panel. Enable this button from Live View Cong > Viewer Settings.
AMC Audio Controls
AMC audio buttons control the speakers and microphone connected to the client computer. The buttons are only visible when
audio is enabled.
For information about how to congure audio, see Set Up Audio on page 25.
Speaker button — Click to turn the speakers on or off.
Microphone button – Click to mute or unmute the microphone. In Simplex - speaker only mode, the Microphone and Talk
buttons must both be active to send audio to the Axis product. Click either button to stop audio transmission.
Use the slider to control the volume of the speakers and the microphone.
Half-duplex mode
The Talk/Listen button is used to switch between sending and receiving audio. The button can be congured
from the Audio tab in the AMC Control panel:
• Push-To-Talk mode: Click and hold the button to talk/send. Release the button to listen.
• Toggle mode: Click once to switch between talking and listening.
Simplex – speaker only mode
To send audio, the Talk and Microphone buttons must both be active. Click either button to stop audio
transmission.
Note
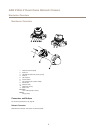
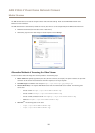
These controls are available if digital PTZ is enabled in the selected view area, see View Area on page 22.
With the PTZ Control Queue enabled the time each user is in control of the PTZ settings is limited. Click the buttons to request or
release control of the PTZ controls. The PTZ Control Queue is set up under PTZ > Control Queue.
Click the Emulate joystick mode button and click in the image to move the camera view in the direction of the
mouse pointer.
Click the Center mode button and click in the image to center the camera view on that position.
The center mode button could also be used to zoom in on a specic area. Click in the image and drag to draw a
rectangle surrounding the area to be magnied. To zoom out, rotate the mouse wheel.
Click the Ctrl panel button to open the PTZ control panel which provides additional PTZ controls.
User-dened buttons can also appear in the Control panel. See Controls on page 30.
To view a specic view area or preset position, select it from the Source list.
Pan and Tilt bars – Use the arrows to pan and tilt the camera view, or click on a position on the bar to steer the camera view to
that position.
Zoom bar – Use the arrows to zoom in and out, or click on a position on the bar to zoom to that position.
The PTZ controls can be disabled under PTZ > Advanced > Controls, see Controls on page 30.
13