


21
© 2006 Avaya Inc. All rights reserved.
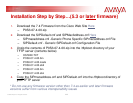
Additional Configuration Notes (Upgrading from very old
Cisco firmware releases) - Incremental Upgrade Steps
5. Rename the SIPmacaddress.cnf file to SIP + MAC address of your 7960 SIP
phone (the lab 7960’s MAC address is: 00-09-43-66-53-83). All alpha
characters are UPPERCASE
(the .cnf is lowercase)
– SIP000943665383.cnf
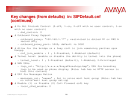
6. Make the edits detailed in the following slides titled, “Key changes (from
defaults) in: SIPDefault.cnf” – don’t forget to make the below changes, unique
to your environment
– proxy1_address, sntp_server, outbound_proxy, logo_url, messages_uri
– Verify: image_version is set to P0S3-05-3-00
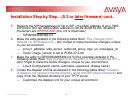
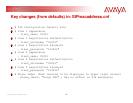
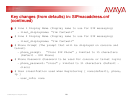
7. Make the edits in (SIP000943665383.cnf for this example) detailed in the
following slides titled, “Key changes (from defaults) in: SIPmacaddress.cnf”–
don’t forget to make the below changes, unique to your environment
– Line # Configuration (name, authname, password, display name)
8. Create the dialplan.xml file as detailed in the following slides titled, “Creation
of dialplan.xml (stored in the /tftpboot directory along with the SIP phone
firmware)” and copy it into the /tftpboot directory of your TFTP server
– Customize the dialplan.xml for your unique environment