5
GETTING STARTED APPENDIX
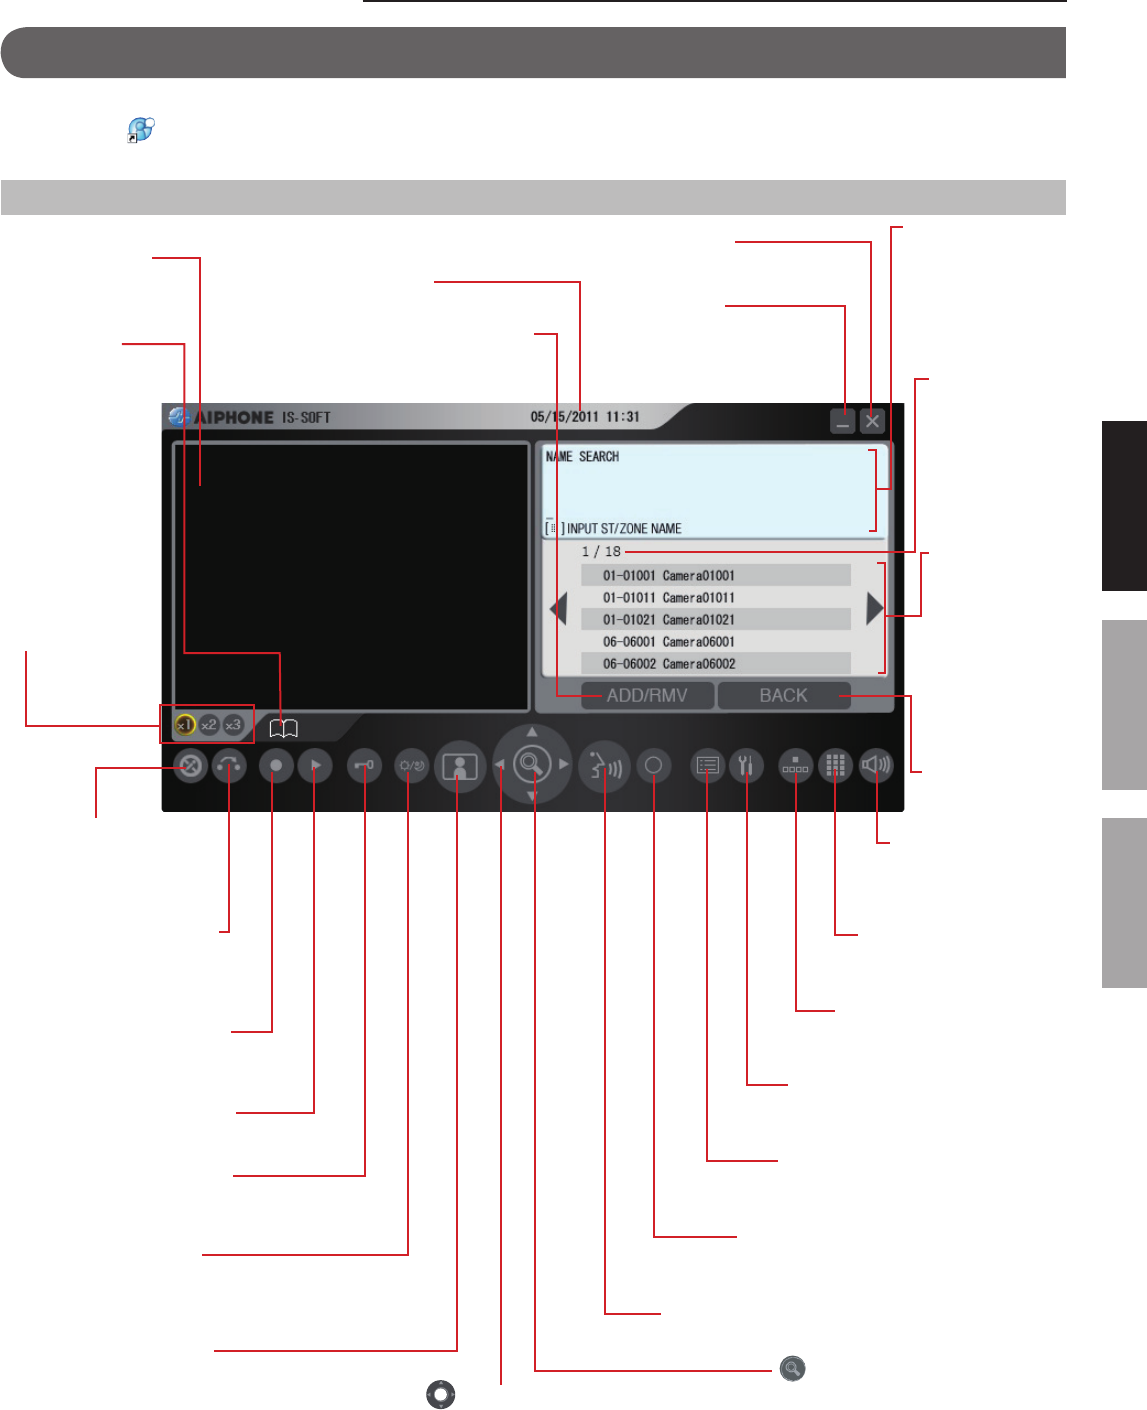
USING THE PC MASTER STATION
PART NAMES AND THEIR FUNCTIONS
NOTE:
Confi rm the icon
on the task bar at the bottom-right of the PC screen is blue. If the icon is gray, the settings have not been made correctly.
(
→
“SETTING MANUAL”)
Main window
Minimize button
Minimizes the main window.
Status display
icons
(Refer to the next
page for details.)
Video x1, x2, x3
buttons
Change the size of
the main window.
* “x3” may not
appear depending
on the PC.
Volume control
window button (→P. 7)
Opens the Volume
control window.
Dial keys window button
(→P. 21)
Opens the Dial keys window.
Speed dial window button
(→P. 24)
Opens the Speed dial window.
SETTING button
Opens the Setting window. (Refer to
the SETTING MANUAL for details.)
LIST button (→P. 20)
Click to display the registered stations,
zones or remote sites in the list area.
OFF button (→P. 13)
Click to fi nish communication,
monitoring or calling.
TALK button (→P. 13)
Click to answer a call or call the selected station.
(ZOOM/WIDE button) (→P. 15)
Switches the display mode between
zoom and wide. (This button is also
used for determining the selection.)
ADD/RMV (Add/Remove) button (→P. 21)
Adds or removes stations and/or zones in
the list.
BACK button
Returns to the
previous status.
List area
The list of the
stations, zones and/
or remote sites you
searched for is shown
here. Stations, zones
and/or remote sites
are displayed either
by number and/or
name depending
on the setting in the
Setting window.
List page no.
When the list of
stations, zones
and/or remote
sites, or setting
items consist of
two or more pages,
the current page
no. is shown here.
Message area
Displays the number(s)
(or name(s)) of the
selected station(s),
zone(s) or remote
site, and the station
number of this PC
master station.
PRIVACY button (→P. 18)
Click so that the button
lights up to turn on the
privacy function.
Record/Stop button (→P. 29)
Records the displayed image
on the PC.
TRANSFER button (→P. 17)
Click so that the button
lights up to transfer a call to
another master station, etc.
(Pan & Tilt control button) (→P. 15)
Moves the images on the video display area from
right to left or up and down.
Play window button (→P. 30)
Opens the Play window.
Door release button (→P. 18)
Click so that the button lights up to unlock the
door connected to the received door station.
ADJUST button (→P. 16)
Click so that the button lights up to adjust the
image on the video display area when it is hard
to see in the daytime or darkness.
MONITOR button (→P. 26)
Click to monitor the selected
station or start scan-monitoring.
Close button
Closes the PC main window.
Video display area
Displays station type
images and images from
a video door station.
Time and date display
Displays the time and date.
GETTING STARTED


