


12 13
When the handset is fully charged the display shows the
symbol.
4. After 16 hours, connect the phone line cord to the main base and plug the other end into the wall
socket.
Your Telstra 7300/7300a multi handset pack is now ready for use.
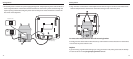
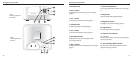
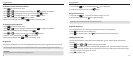
Wall mounting your 7300/7300a
The Telstra 7300/7300a can be wall mounted to a standard Telstra wall mount plate. To wall mount
the phone proceed as follows:
1. Place the wall mount bracket over the two retaining screws of your standard Telstra wall mount
plate.
2. Slide the bracket downward into position.
Alternatively to wall mount the phone:
1. Using the template on page 75, drill two 3mm holes. Insert plastic plugs (optional) and partially
screw two screws into place. Ensure there is sufficient space allowed for mounting the phone before
drilling holes.
Caution: Ensure there is no risk of damaging any pipes or wiring that may be behind the wall.
2. Place the wall mount bracket over the two screws.
3. Slide the bracket downwards into position.
Tighten the two screws to prevent the
wall bracket from moving.
>OV]^\K
AKVVWY_X^
ZVK^O
Getting started
Under no circumstances use non rechargeable batteries. Only use NiMH rechargeable batteries with
a capacity of 600mAh or higher. Using inappropriate batteries will invalidate your guarantee and
may damage the telephone.
Telstra 7300/7300a multi handset pack only
Location
You need to place your Telstra 7300/7300a charger close enough to a mains power socket so that the
cable will reach.
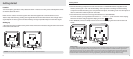
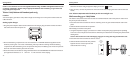
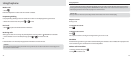
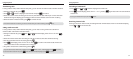
Setting up the charger
1. Plug the power adaptor cable into the underside of the charger, plug the other end into the mains
wall socket and switch the power on.
:YaO\
KNKZ^Y\ZV_Q
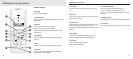
2. Remove the battery compartment cover and insert the 2 x AAA NiMH batteries supplied into the
handset, ensuring the + and -ends of the battery match up with the markings inside the battery
compartment. Slide the battery cover compartment into place. The battery cover must be in place at
all times when the handset is placed in the cradle.
3. Place the handset on the base to charge the batteries for at least 16 hours.The extension handset is
pre-registered to the base as –2– (Telstra 2). This is shown on the display.
Getting started