


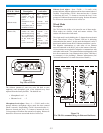
The sidetone (amount of your own voice fed back to your
earphones) and microphone gain of the beltpacks may need
adjusted from the factory defaults. The defaults are:
• Microphone Level = 4
• Sidetone Level = 2
Microphone Level Adjust – Press <1> + <TALK> until a voice
prompt indicates microphone adjust mode has been entered
(about 3 seconds). Keep holding <TALK> down and use the <1>
button to decrease the level, <2> button to increase the level.
Voice prompts will indicate the current level setting. Release all
buttons for at least one second and the level will be set.
Sidetone Level Adjust – Press <TALK> + <2> until a voice
prompt indicates sidetone adjust mode has been entered (about 3
seconds). Keep holding <TALK> down and use the <1> button
to decrease the level, <2> button to increase the level. Voice
prompts will indicate the current level setting. Release all buttons
for at least one second and the level will be set.
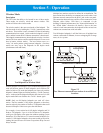
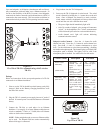
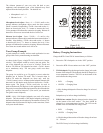
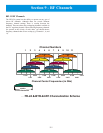
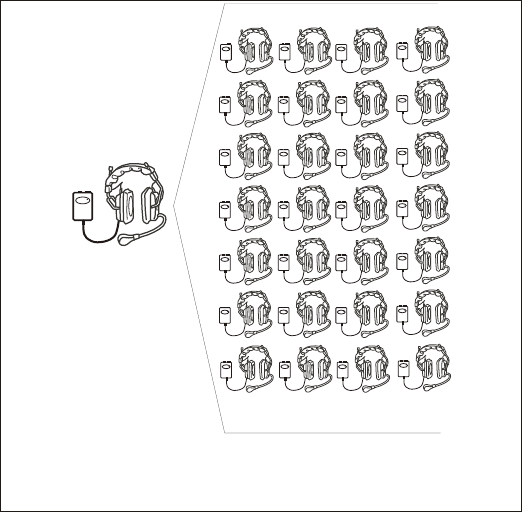
Tour Group Example
A good example of a master wireless mode application is a tour
group within a noisy manufacturing environment.
As shown in the Figure, a single TR-24 is set to boot in “master
wireless”. This beltpack would be worn by the tour guide. The
rest of the beltpacks are set to boot in “wireless” mode and
Push-to-TX (Push-to-TX beltpacks have their <TALK> button
set to momentary only). The tour group would wear these
beltpacks.
The group size could be up to 28 people (or more) when the
beltpacks are in Push-to-TX mode. This is because when in
Push-to-TX mode the beltpacks are listen only, until the
<TALK> button is active. At that point the beltpack transmits full
time and is in full duplex mode until user releases the <TALK>
button again. The group’s TR-24s could also be used in
push-to-latch mode (full duplex) for this application, but due to
the greatly increase bandwidth requirement for this talk mode the
group’s size would be limited to 9 (Ten total if you include the
tour guide's master beltpack).
NOTE: Only 9 full duplex beltpacks can work off a master
beltpack. Thus the number of full duplex beltpacks working off
that master beltapck must be reduce by the number of Push-to-TX
beltpacks that could become full duplex, at the same time, if their
users press the talk button.
Figure 5-12
Tour Group Application
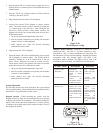
Battery Charging Instructions
Charge the BTR-24 and TR-24 internal battery as follows:
1. Ensure the TR-24 beltpacks are in the “OFF” position.
2. Ensure the BTR-24 base stations are in the “OFF” position.
3. TR-24 beltpack: Plug the charger into the charge jack on the
bottom of the beltpack. The beltpack should be charged in a
room temperature location. The LED on the bottom of the
unit indicates the charge status.
• RED = Charging
• GREEN = Charging Done
A fully discharged beltpack will need to charge for at least 6
– 8 hours.
Beltpacks may be left on charge indefinitely.
4. BTR-24 base station: Plug the charger into the charge jack
on the bottom of the base station. The base should be
charged in a room temperature location. The LED on the
bottom of the unit indicates the charge status.
• RED = Charging
• GREEN = Charging Done
A fully discharged base station will need to charge for at least
10 – 14 hours.
The BTR-24 may be left on charge indefinitely.
Telex
TR-24
R
TOUR GUIDE
Telex
TR-24
R
Telex
TR-24
R
Telex
TR-24
R
Telex
TR-24
R
Telex
TR-24
R
Telex
TR-24
R
Telex
TR-24
R
Telex
TR-24
R
Telex
TR-24
R
Telex
TR-24
R
Telex
TR-24
R
Telex
TR-24
R
Telex
TR-24
R
Telex
TR-24
R
Telex
TR-24
R
Telex
TR-24
R
TOUR GROUP
Telex
TR-24
R
Telex
TR-24
R
Telex
TR-24
R
Telex
TR-24
R
Telex
TR-24
R
Telex
TR-24
R
Telex
TR-24
R
Telex
TR-24
R
Telex
TR-24
R
Telex
TR-24
R
Telex
TR-24
R
Telex
TR-24
R
5-7