


6
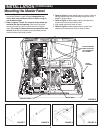
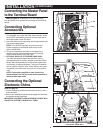
Connecting the Master Panel
to the Terminal Board
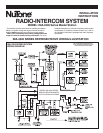
Refer to Figure 14. Connect the 11, 9, 4 & 2 pin plugs
from the Master to the appropriate connectors on the terminal
boards.
Connecting Optional
Accessories
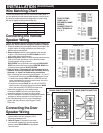
1. Refer to Figure 15. To connect an external audio source
(CD, Cassette, etc.) to the IMA-3303 Radio Intercom, locate
the CD/TAPE and AUXiliary input on the lower right side of
the master station’s main PC board.
2. Insert the audio source output plug into the appropriate input
jack on the master station.
NOTE: The CD/TAPE input has an input level control
to allow matching of the external audio source to the
built-in AM/FM tuner.
3. To use the selected source audio for recording onto a
cassette recorder, insert the tape recorder’s input plug
into the master station’s LINE OUT jack.
4. OPTIONAL HOOK-UP TO PROVIDE RADIO ONLY:
The radio and optional entertainment sources can be
channeled through an auxiliary amplifier (purchase NuTone
Model: IMA-516 separately) to provide uninterrupted music
(no intercom) to separate speakers. This type of installation
can be used for a doctor’s office, where intercom and music
are desired in the office area, but music only in the waiting
room.
NOTE: If an auxiliary amplifier is used, connect the
master station’s line out jack to the auxiliary amplifier’s
low-level radio input wires.
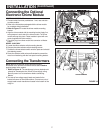
Connecting the Optional
Electronic Chime
Refer to Figure 16.
1. Connect NuTone IW-2 cable from the chime to the (+) and (-)
screw terminals.
2. Refer to the Installation Instructions packaged with the chime
for complete wiring information.
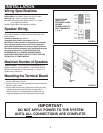
IMPORTANT: FAILURE TO USE NUTONE IW-2 CABLE WILL
CAUSE THE SYSTEM TO HUM AT ALL TIMES.
INSTALLATION
(Continued)
FIGURE 14
FIGURE 15
AUXILIARY
INPUT
CD/TAPE INPUT
CD/TAPE INPUT
LEVEL ADJUSTMENT
LINE OUTPUT
9 PIN
11 PIN
2 PIN
4 PIN
FIGURE 16
ELECTRONIC CHIME INPUT