


4
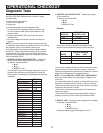
FIGURE 7 FIGURE 8 FIGURE 9 FIGURE 10
INSTALLATION
(Continued)
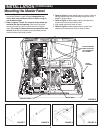
Mounting the Master Panel
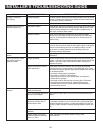
1. Refer to Figure 6. Use two (2) no. 6 x
3
⁄8" screws to attach
mounting brackets to rough-in frame Using bottom set
holes, make sure brackets are flush to wall or rough-in
and screws are tight.
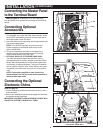
2. Refer to Figures 7 and 8. For rough-in frames which are
recessed into the wall opening, insert two (2) shoulder
screws (provided) into the front two holes in the rough-in
frame. For rough-in frames which are mounted flush with
the wall, insert two (2) shoulder screws (provided) into the
back two holes in the rough-in frame.
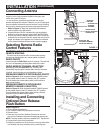
FIGURE 6
SUPPORT STRAP
ROUTE SPEAKER
WIRES THROUGH
LEFT-HAND SIDE
OF CHANNEL
AM/FM
ANTENNA
HEAT SINK
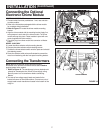
3. Refer to Figure 9. Attach master panel to rough-in frame by
placing keyhole slots in both mounting hinges over screw
heads in rough-in frame.
4. Refer to Figure 10. Slide master panel to the right, then
forward until panel is flush with the wall.
5. Align master panel with rough-in frame.
6. Refer to Figure 6. Attach support strap to rough-in by
attaching onto oblong hole in top of rough-in frame.