


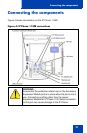


Connecting the components
31
over the CAT5e cable, the LAN must support Power over Ethernet,
and an AC adapter is not required.
Note 2: You must use CAT5e (or later) cables if you want to use
gigabit Ethernet.
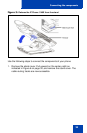
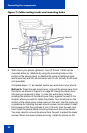
3. Install the handset. Connect the end of the handset cable with the
short straight section into the handset. Connect the end of the
handset cable with the long straight section to the back of the phone,
using the RJ-9 handset jack marked with the symbol
+. Form a small
bend in the cable, and then thread the handset cord through the
channels in the stand so that it exits behind the handset on the right
side, in the Handset cord exit in the stand base marked with the
symbol
+, as shown in Figure 7 on page 32.
4. Install the headset (optional). If you are installing a headset, plug the
connector into the RJ-9 headset jack marked with the symbol ) on the
back of the phone, and thread the headset cord along with the
handset cord through the channels in the stand, so that the headset
cord exits the channel marked with the symbol ).
5. Install the Ethernet cable. Connect one end of the supplied Ethernet
cable to the back of your phone using the RJ-45 connector marked
with the symbol %, and thread the network cable through the channel
marked with the symbol %.
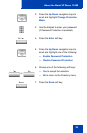
6. If you are connecting your PC through the phone, you will require a
second CAT5e cable. Only one cable is included with the
IP Phone 1140E package. Install the Ethernet cable connecting the
PC to the phone (optional). Connect one end of the PC Ethernet
cable to your phone using the RJ-45 connector marked with the
symbol ( and thread it through the channel marked with the symbol (.
Connect the other end to the LAN connector on the back of your PC.
7. Install additional cables. If applicable, plug in optional USB devices.
Connect the Ethernet cable to the LAN Ethernet connection. If you
are using an AC power adapter, plug the adapter into an AC outlet.