


STEP 2 PRESS all 3 buttons in sequence: left-center-right.
The BEEPER will BEEP when each button is
pressed. If BEEPER does not BEEP, the timer is
defective. STOP TESTING. Reset procedure is
completed when 1:00 appears on the digital dis-
play.
OPTIONAL TIMER
OPERATING INSTRUCTIONS
PART # 056921
DIGITAL TIMERS
The electronic timers, standard on TS &
IFM models, provide a clearly visible and
accurate display and are very easy to use.
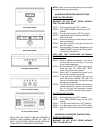
PROGRAMMING
To program the timers, the unit must be in the idle mode.
Press and hold the set button for approximately two sec-
onds. The display will show “SEt”. Press the button for the
channel to be programmed. The display will show the cur-
rent setting for that channel. Use the up or down button to
increment or decrement the setting. When the setting is
correct, press and hold the set button again for approxi-
mately two seconds. The display will show "StO" for
approximately two seconds and the timer will return to
normal operation. Repeat the process as necessary for
the other timers.
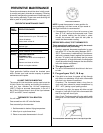
OPERATING LOGIC
When the timer is powered up, the display will show the
time setting for the channel that was operated last and the
relay output contacts will be open. To start a cycle, press
the desired channel button (1-3). The display will begin to
countdown from the preset time setting and the relay out-
put contacts will close. During the countdown the colon
will flash at a one-second rate. When the countdown has
reached "00:00" the relay output contacts will open, the
display will flash, and the audible alarm will sound. To can-
cel the audible alarm, press any button.
PAUSE FEATURE
To pause a cycle in progress, press any button. The relay
output contacts will open, the display will flash, and the
countdown will pause. To resume the countdown, press
any button. The display will resume the normal countdown
and the relay output contacts will close.
CANCELING A CYCLE
To cancel a cycle in progress press and hold any button
for approximately two seconds. The relay output contacts
will open and the display will show the time setting for the
channel last used.
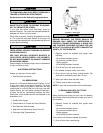
WARRANTY REPAIRS
Keating's warranty begins with the date of installation.
In the event that your Fryer, under warranty, needs
repairs other than routine cleaning, you are requested
to contact KEATING OF CHICAGO, INC.
(1-800-KEATING) before calling a local service compa-
ny.
ORDERING PARTS
Parts may be ordered by part number by calling your
local service company or Keating at 1-800-KEATING.
You may also order on-line at Keating’s part store,
www.keatingofchicago.com.
Refer to the Keating Gas Fryer Limited Warranty for
warranty service information.
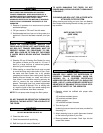
The model/serial plate is located on the inside of the
front door. The serial and model numbers are neces-
sary when ordering.
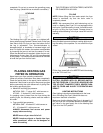
WARNING AND OPERATING PLATES
All warning and operating plates on the Keating Gas
Fryer should be in place at all times.
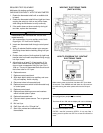
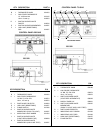
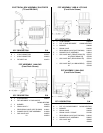
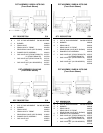
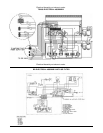
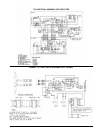
PARTS LIST
CONTROL PANEL AA GAS
Corresponds with parts list on page 12
11
1:00