


REQUIRED TEST EQUIPMENT:
Multimeter (for testing continuity)
CHECKING CONTINUITY WITH THE MULTIMETER
1. Rotate the thermostat shaft until an audible click
is heard.
2. Rotate the thermostat shaft left and right ten times
causing the switch to click on and off ten times,
while using the Multimeter to verify continuity.
3. If the switch does not show continuity during all
ten trials, replace the thermostat.
WARNING
Disassembling the thermostat will void the ther-
mostat warranty.
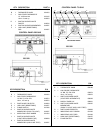
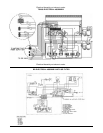
1. Set compression ring onto capillary end of bulb
finger tight, 1/2” from end of capillary.
2. Insert new thermostat bulb through control panel
back.
3. Apply oil resistant flexible sealant onto compres-
sion fitting thread before installing fitting into fryer
vessel.
4. Position bent portion of bulb against far right heat
transfer tube and install compression fitting snugly
into fryer vessel.
5. Adjust bulb so at least 2” of bent portion of it is
next to heat transfer tube and tighten compres-
sion nut onto compression fitting for fryer 10x11,
18 & up. The end of thermostat bulb should touch
the burner tube for 14" fryers.
6. Replace burners.
7. Replace control panel back.
8. Slide back fabric shield over capillary and care-
fully coil capillary. Avoid crimping.
9. Reconnect wires to thermostat body.
10. Replace two screws which hold thermostat body
to control panel.
11. Replace control panel.
12. Replace three retaining screws and washers
which hold dial plate in place.
13. Replace thermostat knob.
14. Connect electric power source. Turn on gas and
pilots.
15. Boil out fryer.
16. Refill fryer with oil to “fill level line”.
17. Start fryer, preheat and calibrate with
thermometer.
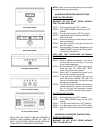
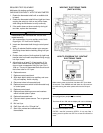
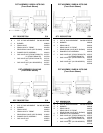
“KEATING” ELECTRONIC TIMER
(PART # 023709)
HOW TO PROGRAM THE “KEATING”
ELECTRONIC TIMER
Make certain power to the timer has been OFF for at least
30 seconds. Then PRESS and hold down the UP arrow but-
ton while turning the rocker power switch to the ON posi-
tion.
Note: If power switch does not turn off timers, the unit must
be unplugged (two people may be needed).
The timer will turn ON and the display will now be indicating
OR
The BEEPER will BEEP 4 times.
If STEP 1 was OK, proceed to STEP 2. If not, retry Step 1
making sure the power was OFF for at least 30 seconds or
more.
– – –
– – –
10
•
•