


Chapter 40 Cisco IP Phones
Phone Configuration Checklist
40-48
Cisco CallManager System Guide
OL-7135-01
Phone Configuration Checklist
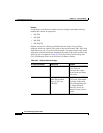
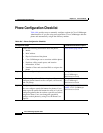
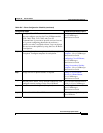
Table 40-6 provides steps to manually configure a phone in Cisco CallManager
Administration. If you are using auto-registration, Cisco CallManager adds the
phone and automatically assigns the directory number.
Table 40-6 Phone Configuration Checklist
Configuration Steps Procedures and Related Topics
Step 1
Gather the following information about the phone:
• Model
• MAC address
• Physical location of the phone
• Cisco CallManager user to associate with the phone
• Partition, calling search space, and location
information, if used
• Number of lines and associated DNs to assign to the
phone
Phone Search, page 40-40
Step 2
Add and configure the phone. Adding a Phone,
Cisco CallManager
Administration Guide
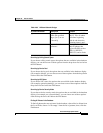
Step 3
Add and configure lines (DNs) on the phone. You can also
configure phone features such as call park, call forward,
and call pickup.
Adding a Directory Number,
Cisco CallManager
Administration Guide
Step 4
Configure speed-dial buttons.
You can configure speed-dial buttons for phones if you
want to provide speed-dial buttons for users or if you are
configuring phones that do not have a specific user who is
assigned to them. Users can change the speed-dial
settings on their phones by using Cisco IP Phone User
Options.
Configuring Speed-Dial
Buttons, Cisco CallManager
Administration Guide