


Model 480i Broadsoft Admin Guide 6
480i IP Phone Configuration
480i IP Phone
Configuration
The Network and SIP options
within the 480i phone can be
conÞgured from the phone or from
the Aastra 480i Web Client web
interface. Administrator level
options are password protected in
both the phone and the web
interface. User level options are
password protected within the
web interface only.
Network
DHCP automatically sends the IP
address, Subnet Mask and Gateway
network (also DNS and TFTP
Server) information to the 480i
phone during initialization when
the phone is Þrst powered up or
reset. By default, the DHCP setting
is enabled. The network settings
cannot be changed when DHCP is
used, so DHCP must be set to "Off"
in order to manually change
these settings.
Turn DHCP On or Off
From the 480i Phone:
1. Press the £ button to
enter the Options List.
2. Select option 8. Network.
3. Enter the administrator’s
password. The default password
is 22222.
4. Press the Enter softkey.
5. Select option 1. DHCP.
6. Press the Change softkey to
indicate whether DHCP should
be used or not.
7. Press Done to save the changes.
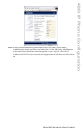
From the Web Client:
1. Click on the Network sub-category
under the ADMIN main category.
2. Enter the administrator’s user
name and password (the default
user name is "admin" and
password is "22222").
3. In the web page that has just
opened, check the Use DHCP check
box to use DHCP and uncheck
to indicate that you do not want
to use DHCP.
4. Click on the Set Values button
to save the changes that you just
made.
Manually Configure
Network Settings
If you are not using DHCP, you
need to conÞgure the network
settings for the phone manually.
From the 480i Phone:
1. Press the £ button to
enter the Options List.
2. Select option 8. Network.
3. Enter the administrator’s
password. The default password
is 22222.
4. Select option 2. IP Address to
change the IP address.
5. Select option 3. Subnet Mask
to change the subnet mask.
6. Select option 4. Gateway to
change the gateway address.
7. Select option 5. DNS to change
the DNS.
8. Press Done to save the changes.
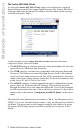
When an IP address has been
assigned to the phone, you have
the option to either continue
conÞguring the 480i through the
£button on the phone or
to start using the Aastra 480i Web
Client. See the section "The Aastra
480i Web Client" within this
guide for details.
From the Web Client:
1. Click on the Network sub-category
under the ADMIN main category.
2. Enter the administrator’s
user name and password (the
default user name is "admin"
and password is "22222").
3. In the web page that has just
opened enter the IP address of
the phone, the Subnet Mask and
the Gateway IP address in their
corresponding Þelds.