


Installation
Unpacking
Each WM1000 / WM2000 is supplied with the following items. Contact the shipper
or your Audiocom dealer immediately if anything is damaged or missing. Detach and
fill out the registration card and return it to Telex to properly register your intercom
station.
Quantity Description
1 WM1000 or WM2000 Intercom Station
1 Warranty and registration card
1 User Instructions
4 Mounting Screws
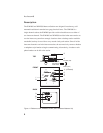
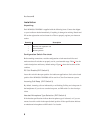
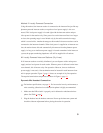
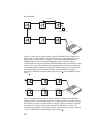
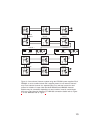
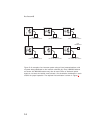
Configuration Switch Pre-check
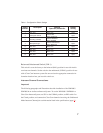
Before making connections, read the configuration switch notes that follow and
make sure that all switches are properly set for your intended usage. Table 1
lists the
switch descriptions and factory default settings. Figure 1 shows the locations of the
switches.
DC Call Enable (DIP Switch 2)
Leave this switch in the open position for Audiocom applications. Set it to the closed
position if the WM1000 / WM2000 will be used in a Clear-Com intercom system.
Incoming Call Beep (DIP Switch 3)
By default, incoming calls are indicated by a red-flashing Call key and a beep tone in
the headphones. If you do not want the beep tone, set DIP switch 3 to the closed po-
sition.
Headset Microphone Type Selection (DIP Switch 4)
If the headset specifications indicate the microphone type is balanced, or if you are
unsure, leave this switch in the open (default) position. If the specifications indicate
an unbalanced microphone set DIP switch 2 to closedn.
6
Audiocom®