


- 7 -
Selecting a site for the Base unit
The phone base unit should be installed where the mains adaptor plug will reach the power socket and, the
telephone cable will reach your telephone socket and not to close to other electrical equipment (such as
washing machines, microwaves, TV, fluorescent lights, etc.
1. Make sure the telephone line is not yet connected to the telephone wall socket.
2. Plug the mains AC adaptor into a mains socket and into the base of the phone. The base will beep,
then insert the phone line plug into the phone socket and the other end into the base unit
.
Charging the batteries
Please charge the handset batteries for 14 hours before first use to maximise battery performance.
1. Only use the rechargeable batteries supplied with this phone.
2. Remove battery cover on the handset and Install the batteries supplied ensuring you observe the
correct polarity. Replace the battery cover.
3. Place the handset on the base unit to charge for at least 14 hours.
4. The red LED CHARGE light on the base unit indicating that the handset is charging, Note: The charge
light will stay on even when battery is fully charged – and whenever the handset is on the base.
NOTE: if the charge LED on the base does not light up, reposition the handset in the base unit ensuring the
charging points make contact. Regular cleaning is necessary for base and handset charge contacts. Use a
clean dry cloth..
Handset battery charge level
1. The Level of the battery power is indicated as a battery icon on the LCD display in the handset. If the
battery icon shows empty, your phone needs to be charge.
2. When in use and your phone emit battery low warning tone, your phone needs to be charge.
3. When fully charged your phone will provide up to 8 hours talk time and up to 100 hours of standby time.
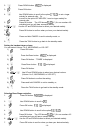
Setting the handset date and time
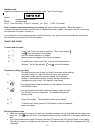
1. Press the OK button to enter MENU settings. You will see
in the display.
2.
Press DOWN button to scroll to option
3. Press OK button to confirm.
4.
Press DOWN button to scroll to .
5. Press OK button again. The first digit of Date will flash.
6.
Enter two digits of the current date (e.g. 26) from the numeric
keypad. Then the digit of Month will flash.
7.
Enter two digits of the current month (e.g. 08) from the numeric
keypad. Then the digit of Hour will flash.
8.
Enter two digits of the current hour (e.g. 18) from the numeric
keypad. Then the digit of Minute will flash. (Note: The Date/Time format is 24 hours.)
9.
Enter two digits of the current minute (e.g. 54) from the keypad.
10. Press OK button and confirmation tone will be heard..