


14
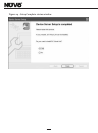
(6) Left-click “Yes” to accept the Silex Software License Agreement.
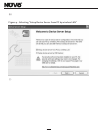
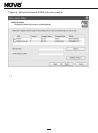
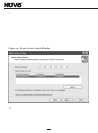
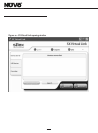
(7) The Device Server Search window will come up. If you already see a device in the Search
result overview panel as shown in Figure 14, left-click the device to select it, and then left-
click “Next”. If there is no device showing, then read the 12-character Ethernet address off of
the adhesive label on the side of the Device Server. This is located directly under the bar
code. Enter the Ethernet address on this label into the field at the top of the Device Server
Search label, as shown in Figure 14. The first six characters, 008092, should already be filled
in. After all of the Ethernet Address has been entered, left-click “Search”. The device should
appear in the Search result overview pane. Left-click “Next”.
Figure 14 – Device Server Search Window
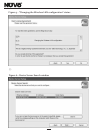
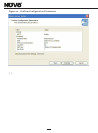
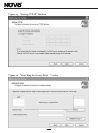
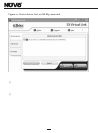
(8) Make certain that the default “Get IP Address Automatically” option is set in the “Setting
TCP/IP” window shown in Figure 15. In the unlikely event that the user's network is set up
without DHCP enabled, then you will have to click Assign IP Address, and enter the values for
the three fields “grayed out” in the window below. Refer to the Silex manuals available on
the NuVo NV-USBW/SX-2000WG setup CD for details. Finally, left-click the “Next” button.