


10
INSTALLING THE PHONE
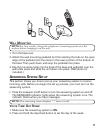
1. Choose an area near an electrical outlet and telephone wall jack (RJ11C).
2. Plug the AC power supply into the electrical outlet and the DC connector
into the power jack on the back of the base.
CAUTION: Use only ATLINKS, Inc. power supply 5-2605 that came with
this unit. Using other power supplies may damage the unit.
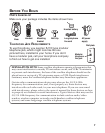
3. Install the handset battery.
NOTE: You must connect the handset battery before use.
NOTE: Battery and battery door are packaged together inside a plastic bag
and are separate from the handset.
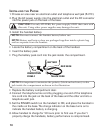
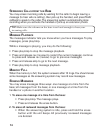
•Locate the battery compartment on the back of the handset.
• Insert the battery pack.
• Plug the battery pack cord into the jack inside the compartment.
NOTE: It is important to maintain the polarity (black and red wires) to the
jack inside the compartment as shown in the illustration
•Replace the battery compartment door.
4. Connect the telephone line cord by plugging one end of the telephone
line cord into the jack on the back of the base and the other end into a
telephone wall jack.
5. Set the RINGER switch (on the handset) to ON, and place the handset in
the cradle on the base. The charge indicator on the base turns on to
indicate the handset battery is charging.
6. Allow handset to charge for 16 hours prior to first use. If you don’t
properly charge the handsets, battery performance is compromised.
RED WIRE
BLACK WIRE
BATTERY
PRESS DOWN
FIRMLY