


11
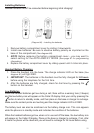
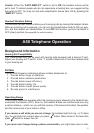
Installing Batteries
Handset batteries MUST be connected before beginning initial charging!
(Diagram #6) – Installing the batteries
1. Remove battery compartment cover by sliding it downwards.
2. Install new batteries. Be sure to observe battery polarity as imprinted on the
base of the compartment (See diagram #6).
3. NOTE: Before replacing the battery compartment cover – you may want to
select setting for the AUTO AMPLIFY MODE (See page #1 for programming
information).
4. Replace the battery compartment cover by sliding upward until it clicks into place.
Handset Battery Charging
1. Place the handset into the base. The charge indicator LED on the base (See
diagram #1) will light RED.
2. IMPORTANT: The batteries in the handset must be fully charged for 24 hours
before using the telephone for the first time.
3. After the batteries are fully charged, check for dial tone by pressing the
button on the handset.
Low Batteries
When the handset batteries get low during a call, there will be a warning tone (3 beeps)
and the low battery icon will appear on the Caller ID display. End your call by pressing the
button to return to standby mode, and then place on the base or charger to recharge.
Make sure the contact points are touching and the charge indicator LED is lit RED.
The battery level can also be monitored via the battery charge icon. This icon appears
while the phone is in standby mode and indicates the condition of the batteries.
When the handset batteries get low, when not in use and off the base, the low battery icon
will appear on the Caller ID display. Place on the base or charger to recharge. If not, after
4 hours the phone will be dead and you will need to recharge for 24 hours before using.