


14 TALKSWITCH START GUIDE • UK & IRELAND
SETUP COMPLETE
Congratulations!
Your TalkSwitch system should now be ready to accept incoming calls.
TIP: Put a TalkSwitch Quick Reference Card next to each extension phone, to help
employees become familiar with the TalkSwitch features.
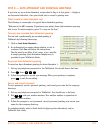
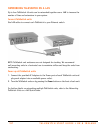
Configuring TalkSwitch 48 remotely
Once installation is complete, you can configure your TalkSwitch 48 via a TCP/IP
connection between TalkSwitch and a remote PC running the TalkSwitch configuration
software. For details, refer to the TalkSwitch Remote Configuration over IP Quick Guide.
Note: If TalkSwitch is installed behind a router/firewall, you will need to map port
9393 to TalkSwitch to enable remote configuration (for details on port mapping, visit
http://www.portforward.com/routers.htm).
What next
• For advanced configuration and complete information on TalkSwitch features, refer
to the TalkSwitch User Guide.
• To add remote extensions to your TalkSwitch system, refer to the Configuring
Remote Extensions Quick Guide.
• To configure your TalkSwitch 48 system to use VoIP, refer to the TalkSwitch VoIP
Configuration Guide for Multi-location Networks.
We trust that your
TalkSwitch phone system
will provide exceptional features,
performance and value to your business. Should you have any further questions, please
contact your authorized TalkSwitch reseller or visit
http://global.talkswitch.com
and
select country or region.
We welcome your feedback, comments and suggestions. Please e-mail us at
info@talkswitch.com
or write us at
TalkSwitch, 1545 Carling Avenue, Suite 510,
Ottawa, ON Canada K1Z 8P9
.
Thank you for choosing TalkSwitch.