


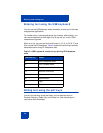
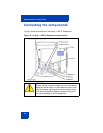


Connecting the components
46
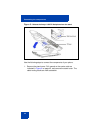
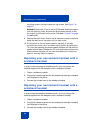
mounting screws, and then tighten the top screws. See Figure 7 on
page 45.
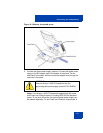
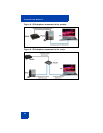
Method B: Attach the 15-cm (6-inch) CAT5e cable, position the stand
over the mounting rivets, and slide the phone down the wall so that
the rivets fit into the slots on the stand, indicated in Figure 7 on page
45 (Method B).
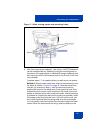
9. Replace the stand cover. Ensure that all cables are neatly routed and
press the stand cover into place until you hear a click.
10. Put the phone in the wall-mount position (optional). If you wall-
mounted your phone, put it in the wall-mount position by holding the
Tilt Lever and pressing the phone towards the base until the phone is
parallel with the base. Release the Tilt Lever and continue to push the
phone towards the base until you hear an audible click. Ensure the
phone is securely locked in position.
Replacing your narrowband handset with a
wideband handset
In order to take advantage of wideband audio, you must replace the
handset supplied with the deskphone with a wideband handset.
1. Obtain a wideband handset.
2. Unplug the handset supplied with the deskphone, leaving the handset
cord attached to the phone.
3. Connect the handset cord to the wideband handset.
Replacing your narrowband headset with a
wideband headset
In order to take advantage of wideband audio, you must replace the
handset supplied with the deskphone with a wideband handset.
1. Obtain a wideband headset.
2. Unplug the handset supplied with the deskphone, leaving the headset
cord attached to the phone.
3. Connect the headset cord to the wideband headset.