


- 30 -
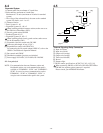
Setting up the System
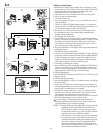
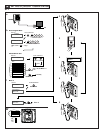
1. Make sure that all units are installed and wired properly. Turn
on the power switch in GH-BC. When the system includes GH-
NS, program the resident information (names and room
numbers) in advance. (For details, see 8-5)
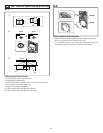
2. Loosen the base screw and open and remove the front panel.
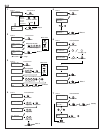
3. Set the system to program mode.
• Lift up the rubber cap.
• Press the program switch once. Use any long thin tool, such as
a fine screwdriver.
• The In-Use LED will blink for approximately 15 seconds for
entrance stations with GH-SW and between approximately 6 to
15 seconds for entrance stations with GH-NS.
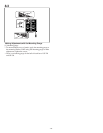
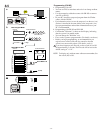
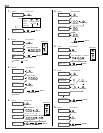
4. Once the In-Use LED is lit solid, press the talk button of the
first residential station. The corresponding communication
channel will be established.
For GH-MK, lift the handset.
5. For GH-SW, press the (corresponding) call button and release
quickly. (Do not press the button longer than 1 second.) For GH-
NS, display the assigned room No. and press the call button
(bell symbol). (Do not press the button longer than 1 second.)
An electronic beep will be emitted once.
6. Press the talk button to end. Repeat these steps and program all
residential stations.
For GH-MK, hang up the handset.
∗
If there is a second residential station installed in a single apartment,
program the residential station following the same method detailed
in steps 4 through 6. An electronic beep will be emitted twice. An
electronic sound will be emitted three times for a third residential
station and four times for a fourth residential station.
7. Correcting or changing the settings
• Press and hold down the call button of GH-SW or GH-NS until
you hear a continuous beep. For GH-NS,display the room you
want to correct and reprogram all the residential stations in the
single apartment (following steps 4 and following).
8. Ending programming
•
Push the GH-DA/A program switch. The In-Use LED will go off.
• Replace the cap.
9. Checking the programming
• Pressing the program switch for 5 seconds or more will light up
the In-Use LED.
• In the case of GH-SW, an electronic beep will be emitted once
when the programming was successful. If the programming was
unsuccessful, an alarm beep will be emitted.
• For GH-NS, use the arrow keys or 10-key to select the room
and press the call button. An electronic sound will be emitted
once when the programming was successful. If the
programming was unsuccessful, an alarm sound will be emitted.
• Press the programming switch to end the check.
If power supply is interrupted during programming, the
programmed information might be lost. In such cases, retry
the programming again from the beginning.
NOTES: 1.
Setting up the light button (GH-SW) In Step 3, press the
call button of the assigned GH-SW while the In-Use
LED is blinking (within 15 seconds in program mode),
the light button will be set up. (The assigned call button
cannot be used as the residential call button
simultaneously.) An electronic beep will be emitted once.
2.
If you attempt to setup a fifth residential station when four
residential stations have already been established, an alarm
beep will be emitted. To cancel the communication link,
display the assigned name and press the call button for at
least 3 seconds. A continuous beep will be emitted to verify
the communication link has been cleared.
8-4
123
45 6
78
ON
ON
OFF
SMITH
101
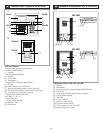
GH-BC
GH-DA/A
GH-SWGH-DA/A
GH-SW
GH-SW
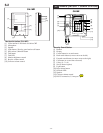
GH-NS
GH-NS
Beeeep
Beeeep
3