


CounterPath eyeBeam 1.5
4
2.3 Configuring eyeBeam
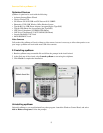
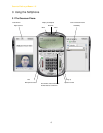
1. Start eyeBeam as you would any other program: Use the Windows Start menu or double-click the
desktop icon. The softphone appears.
2. When starting eyeBeam for the first time, you will be prompted for the license key. Type in the
license key or copy and paste it.
3. The Call display shows Initializing, followed by Discovering network. If no accounts have been set up, the
final message is Awaiting proxy login information. You must set up accounts. See “Setting up Accounts” on
page 4.
4. Make sure that you have enabled at least one account. You can enable more than one account at the same
time. Each time you start eyeBeam, you will automatically be logged into every enabled account.
To enable an account, click at the top of the softphone, choose SIP Account Settings and click enable for
the desired account. For more information on enabling, see page 43.
Setting up Accounts
1. Create the account: Click at the top of the phone and choose SIP Account Settings. Click Add. The
Properties of Account window appears.
2. In the Account tab, complete the User Details area.
3. For the remaining tabs, you can accept the default settings, or you change them to suit your setup. Settings
that you may need to change immediately include:
• Account tab, Domain Proxy area.
• Topology tab, if your computer is on a network and/or behind a firewall.
• The Security tab, if you want to set up secure calls.
For complete details on the Account Settings window, see “SIP Account Settings” on page 43.