


Encryption Code
The BTR/TR-24 system uses a 64 bit DES (Digital Encryption
Standard) encryption algorithm to encrypt all audio in the system.
The beltpacks in the system have a “key” that the algorithm uses
as the basis for the encryption. The same “key” must be used in all
beltpacks on the system for communication to occur. The base
station only relays the audio, and as such, does not need any
encryption code set. The beltpack key can be anything from
numbers to sentences to hexadecimal letters. For example the
phrase, “The BTR-24 system works great for our customers”,
could be the “key” for the encryption. The only criteria is the
phrase/numbers/letters be no more than 80 characters long (this
includes spaces and punctuation).
This encryption is running on all units from the factory and does
not have to be “activated" by the user. The user may want to
change their key to something unique. Please see the "Logging
into a unit" instructions in this section for details on changing the
encryption key.
Login Password
When a user logs into a beltpack or base station, he or she must
enter a user login and password in order to proceed to the user
menu.
• Login: telex
• Password: legacy
The login of "telex" cannot be changed, but for increased security
the password can be changed via the user menu. Please see the
"Logging into a Unit" instructions in this section for details on
changing the password.
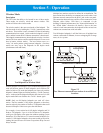
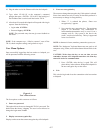
Software Version
Below the password prompt on the user configuration menu
screen (See Figure 6-1), the software version of the unit is
displayed. Pay close attention to the revision letter and the date.
These are the two items that change if the software changes. The
line below the software version indicates the system type. All the
units should indicate TR-24/BTR-24 on this line.
In addition to the software version being displayed on the user
configuration screen, if a beltpack is booted in wired mode, it will
announce the software revision letter one second after the "wired"
voice prompt is heard.
Logging into a Unit
Computer Requirements:
Hardware
• Monitor
• Keyboard & Mouse
• Network card (10 BaseT or 100 BaseT)
• Ethernet straight thru or crossover cable (Use the green
cable supplied with the system.)
Operating System
Microsoft® Windows® 95/98, NT, 2000, XP
Software
Telnet or similar application that lets you communicate to a
specified IP Address (Most all computers have telnet or a similar
program installed on them by default).
The following instructions use Telnet and Windows® 2000 to log
into the beltpack. Other applications and operating systems will
be similar.
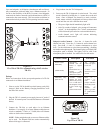
1. Unplug any current RJ-45 network connections from the
computer.
2.
With the mouse, right click the My Network Places con,
then select Properties.
3.
Select Local Area Connection and then right click. Select
Properties.
4.
Select Internet Protocol (TCP/IP) and click on the
Properties button.
5.
Now select “Use the following IP address:” option. Make a
note of your current settings on this screen (so you can place
them back when done logging into the beltpacks).
Enter the following:
a. IP address: 192.168.1.40
b. Subnet Mask: 255.255.255.0
c. Default gateway: 192.168.1.1
6.
Once the above information is entered, hit the OK button. Hit
the OK button on the next screen out if needed. Depending
on your computer, you may need to reboot the computer for
the IP address changes to take effect.
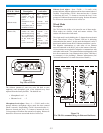
7. Plug one end of the supplied green Ethernet cable into the
computer.
8. Start a “command prompt” console window by clicking on
“Start” then moving the mouse arrow to Programs, then
Accessories and finally clicking on “Command Prompt”.
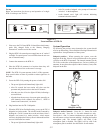
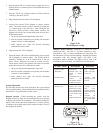
9. Press and hold down the “2” button on the beltpack. Keep
holding the “2” button and turn-on the beltpack. Hold the
beltpack button down until the green LED next to the “2”
button lights up (about 20 seconds), then release button
(Places the beltpack in wired mode).
Section 6 - Encryption Code and Password
6-1