


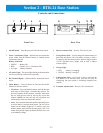
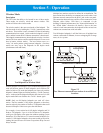
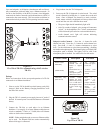
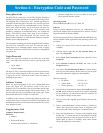
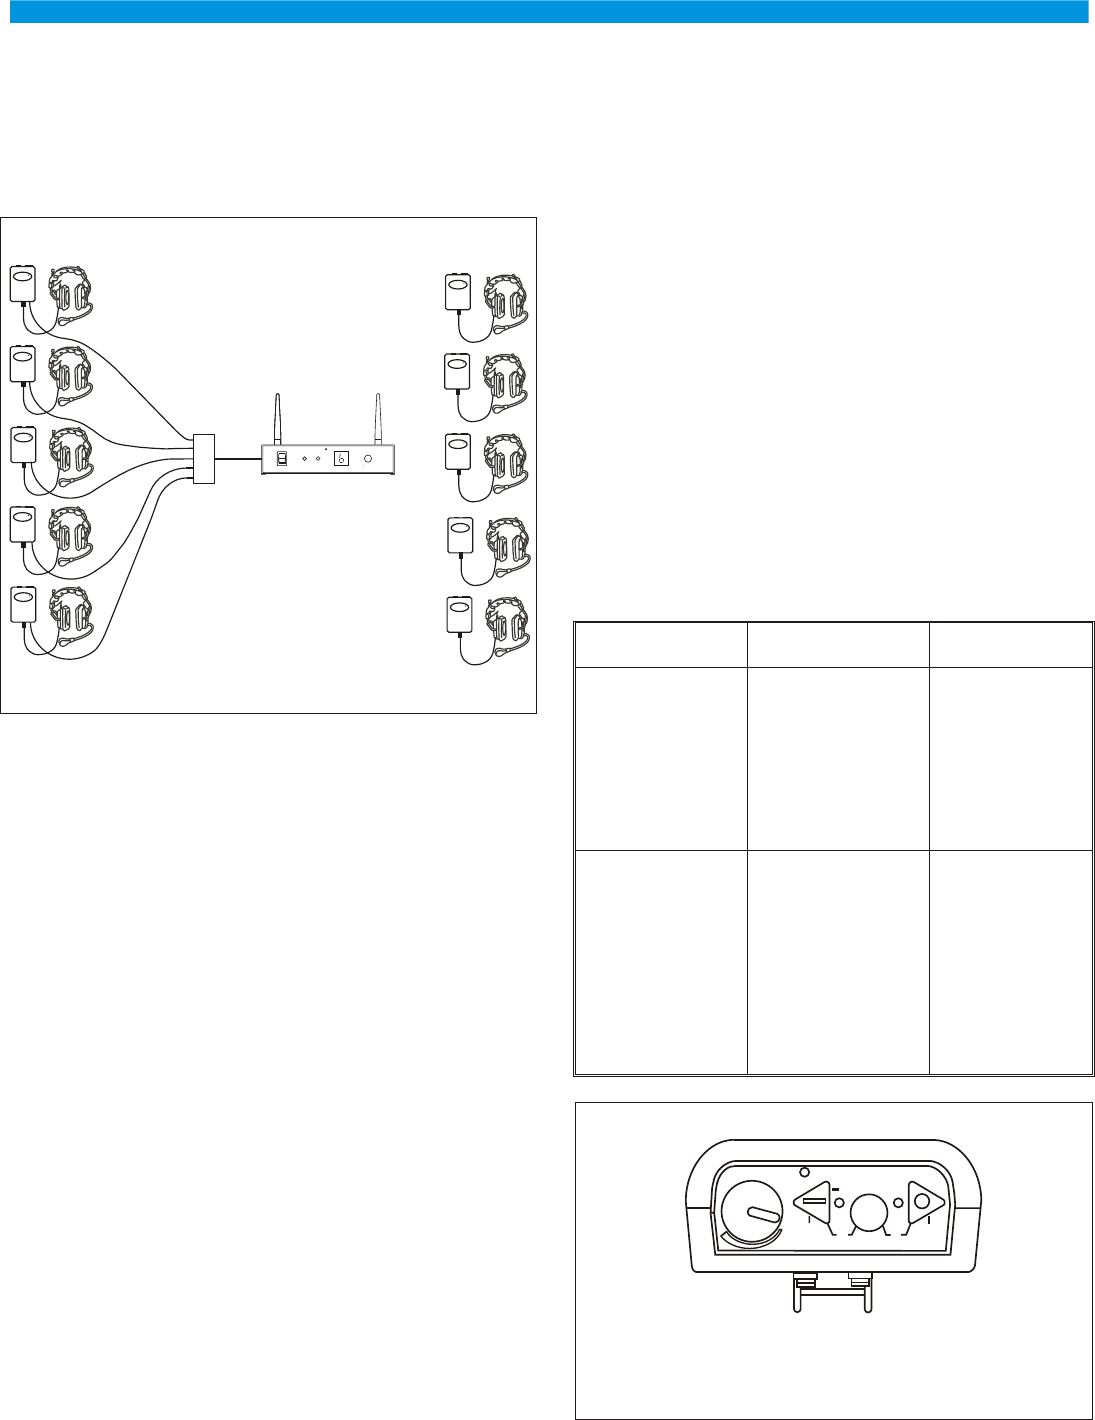
Up to ten beltpacks, in full duplex (simultaneous talk and listen),
may communicate with each other over a Ethernet network. In
fact do to the flexibility of the BTR-24 system, wired beltpacks
connected via a hub to a network could communicate to a BTR-24
connected to the same network. This base station could then be
connected wirelessly to other TR-24s operating in wireless mode.
Figure 5-7
Five Wired TR-24's communicating with 5 wireless
TR-24's
Set-up
Below are instructions for the set-up and operation of a TR-24s
connected via an Ethernet backbone.
1. Prior to use the TR-24 should have their battery packs fully
charged. Refer to the “Battery Charging Instructions” near
the end of this section.
2. Plug the TR-24’s external power supply into an AC outlet if
desired. If external power is not desired then run off internal
battery.
3. Connect the TR-24(s) to each other via an Ethernet
backbone. Use category 5e or better Ethernet cables that are
wired to standards T-568A or T-568B (Most all Ethernet
cables are built to these standards).
NOTE: Either straight through or crossover Ethernet cables
my be used. The beltpack and base station automatically
detect which type is connected.
4. Plug headsets into the TR-24 beltpacks.
5. Power-up the TR-24 beltpacks in wired mode. The wired
mode is entered by holding the <1> button down as the unit
boots. Once a beltpack was booted in a mode (wireless,
wired, master wireless), the beltpack will always boot in that
mode until the user sets a different boot mode.
• The power light should immediately light solid.
• After 20 seconds a beltpack voice prompt will announce
“wired” in the headphone (The "wired" announcement
will be followed by the software version within the unit.).
• Audio channel one’s light will activate indicating
communication has started.
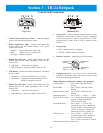
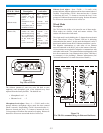
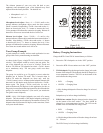
Beltpack Audio Channels - Press the <1> button for audio
channel one only. Press the <2> button for audio channel two
only. Press both <1> and <2> buttons simultaneous to select
both. Use the talk button to select between enabling / disabling
the headset microphone path. The channel light(s) will blink if the
microphone path is disabled. The light(s) will be solid if the
microphone path is enabled. See table below for talk modes:
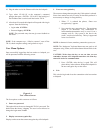
Figure 5-8
Top View of TR-24
5-4
H
U
B
H
U
B
Telex
TR-24
R
Telex
TR-24
R
Telex
TR-24
R
Telex
TR-24
R
Telex
TR-24
R
Telex
TR-24
R
Telex
TR-24
R
Telex
TR-24
R
Telex
TR-24
R
Telex
TR-24
R
ON
OFF
LOW
BATTERY
POWER
AP
ACTIVE
CHANNEL
Telex
RR
SELECT
CHANNEL
CLEAR SCAN
LOCK
BTR-24
OFF
BATTERYBATTERY
TALKTALK
MIC
TelexTelex
S.T.
A J
D
++
1
2
A J
D
<TALK> Mode Description Activation
Push-to-Latch/
Momentary
(default mode)
Microphone is
enabled until the
button is tapped
again.
If held down for 1/2
second the
microphone path is
disabled on release.
Tap <TALK>
button. Tap again
to turn off.
<TALK> held
down for over 1/2
second.
Momentary Only
(Push-to-TX)
<TALK> button
enables the audio
path for only as long
as it is held down.
The beltpack will be
in this mode until
reset to
push-to-latch mode.
Press <1> +
<TALK> + <2>
until voice
prompt indicates
momentary mode
(about 3
seconds). Do
again to go back
to push-to-latch
mode.