36
Synchronization Software
After the Serial Port Setup is
complete, the Settings window will
appear.
To bring up the Settings window
manually, right-click on the
Synchronization icon on the
Windows
®
system tray, then select
"Settings..." in the menu.
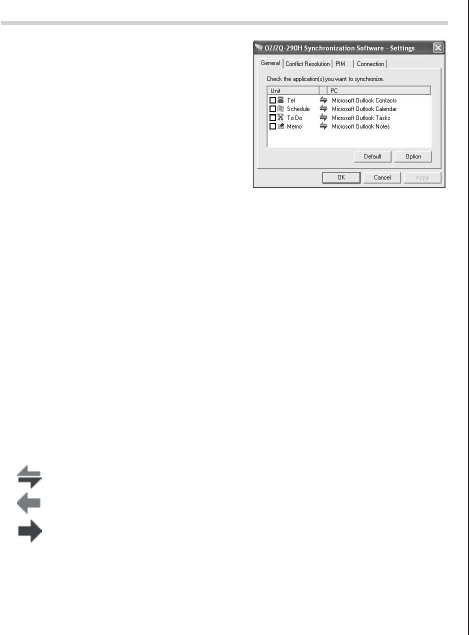
General tab
This tab allows you to select the application that you want to
synchronize with the PC.
• Click on the checkbox for each application to enable synchroni-
zation.
• Use the "Option" button, or double-click the desired settings row
to configure the communication method.
• Click the "Default" button to reset all settings to the default
values, including the Options settings.
Synchronization action:
: Merges the data between the PC and the unit.
: PC overwrites the data of the unit.
: The unit overwrites the PC data.
The Conflict Resolution Tab
The Synchronization software’s Conflict Resolution tab allows you
to select the way data conflicts are resolved when data modifica-
tions are made and the “Synchronize” option is selected on the
General tab.
• Add all conflicting items: Each modification on both the unit and
the PC is reflected and saved respectively after synchronization.
• Unit overwrites PC data: The PC data will be overwritten. The
modifications made on the unit are reflected on the PC after
synchronization.
• PC overwrites unit data: The unit data will be overwritten. The
modifications made on the PC are reflected on the unit after
synchronization.
The PIM Tab
The PIM tab allows you to configure the download settings of the PIM
data.
• Use Outlook HOME ‘Address’ and ‘Fax number’: Downloads or
synchronizes only data of HOME addresses and FAX numbers.
• Use Outlook WORK ‘Address’ and ‘Fax’ number: Downloads or
synchronizes only data of WORK addresses and FAX numbers.
• Today forward: Downloads or synchronizes only data of today and
forward.
• All: Downloads or synchronizes all schedule data.
OZ-290H(En).pm65 04.3.31, 5:09 PM36


